<?xml version="1.0" encoding="utf-8"?><feed xmlns="http://www.w3.org/2005/Atom" xml:lang="en-GB"><generator uri="https://jekyllrb.com/" version="3.10.0">Jekyll</generator><link href="https://blog.barnabycollins.com/feed.xml" rel="self" type="application/atom+xml" /><link href="https://blog.barnabycollins.com/" rel="alternate" type="text/html" hreflang="en-GB" /><updated>2026-03-06T12:21:03+00:00</updated><id>https://blog.barnabycollins.com/feed.xml</id><title type="html">Barnaby Collins Blog</title><subtitle>Hello there</subtitle><entry><title type="html">Panasonic SD-2501 breadmaker seed tray latch</title><link href="https://blog.barnabycollins.com/diy/2025/04/08/panasonic-sd-2501-breadmaker-seed-tray-latch.html" rel="alternate" type="text/html" title="Panasonic SD-2501 breadmaker seed tray latch" /><published>2025-04-08T19:07:00+00:00</published><updated>2025-04-08T19:07:00+00:00</updated><id>https://blog.barnabycollins.com/diy/2025/04/08/panasonic-sd-2501-breadmaker-seed-tray-latch</id><content type="html" xml:base="https://blog.barnabycollins.com/diy/2025/04/08/panasonic-sd-2501-breadmaker-seed-tray-latch.html"><![CDATA[<p>If you’re just coming here to download the 3D model,
<a href="https://cad.onshape.com/documents/fa1020c287b3f629a80ed386/w/444c6b218c426a601e5adb64/e/8c95fde74b85a76c4fdf33ee">here you go</a>.</p>

<p>A few months ago, our beloved breadmaker developed a fault. The plastic latch
that holds the seed dispenser closed had snapped in half. A bit of Googling
indicated that this was a common fault, caused by the constant heat cycling it
experiences above the oven.</p>

<p>Thankfully, Panasonic offers spares for its breadmakers, so it’s possible to buy a
<a href="https://www.pas-europe.com/shop/p/ADA44E165-H0">genuine seed dispenser assembly on its own at a reasonable price</a>,
but I came across
<a href="https://www.youtube.com/watch?v=ODZDdSyz6OY">someone else who had 3D-printed a stainless steel replacement</a>
and thought I could have a go too. They had used Shapeways, and it had been possible
to buy a replacement direct from Shapeways based on their model, but Shapeways were
<a href="https://www.reddit.com/r/3Dprinting/comments/1dwqygc">mid-collapse</a>
when I was looking at it, so it wasn’t really possible to make a new order on there.</p>

<p>I’d not used CAD before but I wanted to learn, and I’d watched enough videos of
<a href="https://www.youtube.com/channel/UCcXhhVwCT6_WqjkEniejRJQ">Martin Molin</a> struggling
to design a marble machine in Fusion360 to be dangerous, so I glued the original
part back together and started measuring. I knew those cheap digital calipers I
bought on a whim during a recreational hardware shop trip would come in handy
eventually!</p>

<p>Eventually I had sketched out the dimensions and turned my sketches into a single
solid object in Onshape. The next step was to find somewhere that would do stainless
steel 3D printing.</p>

<p>I spent a morning uploading my file to various suppliers, and found the cheapest
option to be <a href="https://www.in3dtec.com/online-quote/">IN3DTEC</a>. I ordered the part
for SLM printing in 316L stainless steel. The total came to USD 4.11 for the part,
and USD 24.00 for delivery. I got a 6% new user discount, so the total came to
USD 27.86 - within a couple of pounds of ordering the replacement assembly (priced
at £20.76 as of writing this)!</p>

<p>If you’re doing this, make sure to prepare a drawing of the part that indicates how
it fits into the mechanism, plus photos of the original part and the space that it
sits in. I got an email from IN3DTEC after ordering, asking if I could provide this
information to help inform them on how to print it.</p>

<p>The part arrived 15 days later, and was a good fit. I found that the end of the ‘hook’
was a little too high, a little too rough, and/or a little too sloped, but that was
quickly resolved with a trip to the repair shop, where a rotary tool was available to
grind down the end. The measurements I took were pretty accurate, and used to constrain
the model’s dimensions, so I think the issue was caused at least in part by the
difference in finish between the smooth plastic original and the sandblasted steel
replacement - though the edge is also definitely sharper in the model than it was on the
injection-moulded plastic original.</p>

<p>Over six months later, the latch is still working great, and I also get the satisfaction
of knowing it won’t break any time soon. I’d definitely recommend doing this, as even
a brand new replacement assembly will presumably experience the same fault eventually.</p>

<p>The latch is publicly available as an Onshape document; you can find it
<a href="https://cad.onshape.com/documents/fa1020c287b3f629a80ed386/w/444c6b218c426a601e5adb64/e/8c95fde74b85a76c4fdf33ee">here</a>.
Feel free to modify it to adjust the hook.</p>

<p>There’s also another publicly-available model that I only just discovered while Googling
for this article today, available
<a href="https://www.thingiverse.com/thing:5576296">here on Thingiverse</a>.</p>]]></content><author><name></name></author><category term="diy" /><summary type="html"><![CDATA[If you’re just coming here to download the 3D model, here you go.]]></summary></entry><entry><title type="html">How to set up a computer to boot into a browser kiosk in 2024</title><link href="https://blog.barnabycollins.com/linux/2024/08/18/how-to-set-up-a-computer-to-boot-into-a-browser-kiosk-in-2024.html" rel="alternate" type="text/html" title="How to set up a computer to boot into a browser kiosk in 2024" /><published>2024-08-18T12:46:00+00:00</published><updated>2024-08-18T12:46:00+00:00</updated><id>https://blog.barnabycollins.com/linux/2024/08/18/how-to-set-up-a-computer-to-boot-into-a-browser-kiosk-in-2024</id><content type="html" xml:base="https://blog.barnabycollins.com/linux/2024/08/18/how-to-set-up-a-computer-to-boot-into-a-browser-kiosk-in-2024.html"><![CDATA[<p>Note: This post was written following my experiences setting up mini-PCs to run
my shop window application in the repair shop where I volunteer. The
instructions are also applicable to any other situation where you need to boot
to a fullscreen browser though.</p>

<p>The outcome of this guide should be a computer that boots straight into the
Ubuntu desktop upon receiving power, hides the mouse cursor, and launches a
fullscreen Firefox window pointed at your chosen URL. The computer will be safe
to unplug thanks to a read-only file system, and will keep its screen on
indefinitely. More information on this project can be found in its <a href="https://github.com/barnabycollins/shop-window/blob/main/README.md">project
documentation</a>.</p>

<h1 id="step-1-installing-ubuntu">Step 1: Installing Ubuntu</h1>

<p>Ubuntu is a free operating system based on Linux. It’s more lightweight,
reliable (arguably) and customisable than Windows, so is an ideal option for
this use case.</p>

<p>To install it, you’ll need three things:</p>

<ul>
  <li>A computer to set up the Ubuntu installation media</li>
  <li>The computer that you want to put Ubuntu on</li>
  <li>A USB flash drive</li>
</ul>

<p>You’ll probably want a capacity of at least 8GB (preferably 16GB) for the
latter, and the first two items can be the same computer if necessary.</p>

<p>Ubuntu have their own instructions for this, so I won’t repeat them here - you
can find them at
<a href="https://ubuntu.com/tutorials/install-ubuntu-desktop">ubuntu.com/tutorials/install-ubuntu-desktop</a>.
I’d recommend using the latest LTS version - at time of writing, this is 24.04
LTS. You only need the default selection of apps, and it is up to you whether to
install the proprietary software - for simplicity I have chosen not to.</p>

<p>Make sure to un-tick the ‘Require my password to log in’ box when setting up
your login details. I’d recommend still setting a password, though - this will
ensure that only authorised users can change the computer’s settings in a
meaningful way, as it will prompt you for it in these cases.</p>

<p>You don’t need any additional applications from App Center, or an Ubuntu Pro
subscription.</p>

<h1 id="step-2-installing-necessary-packages">Step 2: Installing necessary packages</h1>

<p>The software we need on top of Ubuntu itself is:</p>

<ul>
  <li>Firefox</li>
  <li><code class="language-plaintext highlighter-rouge">unclutter</code></li>
  <li><code class="language-plaintext highlighter-rouge">overlayroot</code></li>
</ul>

<p>I’ll go into more depth on what the latter two are for later - I’d suggest
reading this article in full before installing, as you may not <strong>need</strong> them for
your use case.</p>

<p>Firefox should come with Ubuntu - if not, follow <a href="https://support.mozilla.org/en-US/kb/install-firefox-linux#w_install-firefox-deb-package-for-debian-based-distributions">the official
instructions</a>.</p>

<p>The other two can be installed by opening a Terminal window and typing:</p>

<div class="language-sh highlighter-rouge"><div class="highlight"><pre class="highlight"><code><span class="nv">$ </span><span class="nb">sudo </span>apt <span class="nb">install </span>unclutter overlayroot
</code></pre></div></div>

<p>You’ll be prompted for your password, and probably also to confirm that you want
to actually install the packages.</p>

<p>They won’t do anything until we configure them, so that’s what the next steps
are going to be about!</p>

<h1 id="step-3-setting-up-the-computer">Step 3: Setting up the computer</h1>

<h2 id="3a-stopping-the-screen-from-turning-off">3a: Stopping the screen from turning off</h2>

<p>This setting can be found in the Ubuntu settings, probably under ‘Power’. Make
sure that the screen will never go blank, and the computer will never go to
sleep.</p>

<h2 id="3b-configuring-wi-fi-if-necessary">3b: Configuring Wi-Fi if necessary</h2>

<p>If your computer will be pointed at a website on the Internet, you’ll need to
connect it to a network on location. If it’s not already configured, make sure
you’re connected to the right network. If the network isn’t in the same place
you’re setting up the computer, you can still set it up in advance - just select
the ‘Connect to a hidden network’ option and fill in the settings as if the
network was there. The computer will attempt to connect for a little bit and
fail, but it will still have saved the network credentials.</p>

<h2 id="3c-enabling-unclutter">3c: Enabling Unclutter</h2>

<p>The <code class="language-plaintext highlighter-rouge">unclutter</code> package we installed before is a piece of software that hides
the mouse cursor when it’s not being used. It’s very handy for this use case, as
without it Ubuntu will show the mouse cursor all the time.</p>

<p>You can enable <code class="language-plaintext highlighter-rouge">unclutter</code> by launching the ‘Startup Applications’ app, and
adding a new entry. The command to run is:</p>

<div class="language-sh highlighter-rouge"><div class="highlight"><pre class="highlight"><code>unclutter <span class="nt">-idle</span> 5 <span class="nt">-root</span>
</code></pre></div></div>

<p>The number after <code class="language-plaintext highlighter-rouge">-idle</code> tells <code class="language-plaintext highlighter-rouge">unclutter</code> how long to wait before hiding the
mouse, in seconds. So, if the mouse isn’t touched for 5 seconds, <code class="language-plaintext highlighter-rouge">unclutter</code>
will hide the mouse.</p>

<p>This process will launch <code class="language-plaintext highlighter-rouge">unclutter</code> when the computer starts up, but we’re not
done yet. Recent versions of Ubuntu ship with the Wayland window manager enabled
by default, but <code class="language-plaintext highlighter-rouge">unclutter</code> only supports X11. This is easy to fix, as both
Wayland and X11 come installed with Ubuntu and you can easily switch back. There
is no equivalent to <code class="language-plaintext highlighter-rouge">unclutter</code> for Wayland at the moment.</p>

<p>To make Ubuntu use X11 instead of Wayland, edit the file <code class="language-plaintext highlighter-rouge">/etc/gdm3/custom.conf</code>
using either the Ubuntu text editor or a terminal-based file editor like
<a href="https://www.nano-editor.org/"><code class="language-plaintext highlighter-rouge">nano</code></a>, which comes with Ubuntu. You should see
a line that says:</p>

<div class="language-sh highlighter-rouge"><div class="highlight"><pre class="highlight"><code><span class="c">#WaylandEnable=false</span>
</code></pre></div></div>

<p>The hash is ‘commenting out’ this line, effectively disabling it. Uncomment the
line by deleting the hash, leaving:</p>

<div class="language-sh highlighter-rouge"><div class="highlight"><pre class="highlight"><code><span class="nv">WaylandEnable</span><span class="o">=</span><span class="nb">false</span>
</code></pre></div></div>

<p>Save the file and restart the computer. Once done, you should find that your
cursor disappears, only reappearing when you move the mouse.</p>

<h2 id="3d-enable-ssh">3d: Enable SSH</h2>

<p>If your kiosk computer is going to be hard to access, you may wish to enable
SSH. This allows you to remotely control it across the network through the
command line. I chose not to do this, but you can enable it easily and there are
many guides on how to do this elsewhere. Make sure to include your Ubuntu
version when searching.</p>

<h1 id="step-4-actually-enabling-the-kiosk-web-browser">Step 4: Actually enabling the kiosk web browser</h1>

<p>Most modern browsers have a kiosk mode; I chose to use Firefox as it is what I
use anyway and it comes pre-installed with Ubuntu.</p>

<p>Enabling the browser is pretty simple - just open the “Startup Applications” app
as before, and add a new entry. The command should be:</p>

<div class="language-sh highlighter-rouge"><div class="highlight"><pre class="highlight"><code>firefox <span class="nt">-kiosk</span> <span class="nt">-private-window</span> <span class="s2">"https://your-url.com/whatever/something?cool"</span>
</code></pre></div></div>

<p>The <code class="language-plaintext highlighter-rouge">kiosk</code> flag fullscreens the browser and makes it impossible to
un-full-screen without using system shortcuts like Alt-F4, and the
<code class="language-plaintext highlighter-rouge">-private-window</code> means the window will open in private mode (otherwise known as
‘incognito’ in other browsers). You can omit these flags if they don’t match
what you’re after.</p>

<p>There’s more information on kiosk mode in Firefox
<a href="https://support.mozilla.org/en-US/kb/firefox-enterprise-kiosk-mode">here</a>.</p>

<p>Restart the computer. You should now find that the browser launches as expected!</p>

<h1 id="step-5-setting-up-a-read-only-file-system-using-overlayroot">Step 5: Setting up a read-only file system using <code class="language-plaintext highlighter-rouge">overlayroot</code></h1>

<p>If you plan to turn your kiosk on and off using a mains timer, or just turn it
on and off at the plug, I’d suggest setting up your computer to use a read-only
file system. What this does is:</p>

<ul>
  <li>Duplicate the computer’s file system as soon as it turns on</li>
  <li>Make the computer use this copy at all times once on</li>
</ul>

<p>The copy is lost each time the computer turns off, but the original copy is
retained as-is. This means that, even if the computer is turned off at a
critical moment and something is broken, it will re-duplicate the original,
unchanged copy of the file system as soon as it turns back on again.</p>

<p>Essentially, it will ensure that you can connect and disconnect your kiosk
computer’s power supply however you like, without any risk of corrupting
anything and causing it to fail to boot the next time.</p>

<h2 id="step-5a-disabling-software-updates">Step 5a: Disabling software updates</h2>

<p>If you’re using a read-only file system, chances are you will want to disable
software updates. Otherwise, your computer will apply the same updates every
time it turns on and then lose them when it’s turned off again. Updates can also
cause unwanted prompts to appear on the screen, such as ‘restart this computer
to update to blahblah’.</p>

<p>Obviously, this presents a security risk, so you may wish to have a plan to
periodically log into your machines and upgrade the software they are running.</p>

<p>To disable software updates, do the following:</p>

<ul>
  <li>Launch the ‘Software &amp; Updates’ application.</li>
  <li>Navigate to the ‘Updates’ tab.</li>
  <li>Set ‘Automatically check for updates’ to ‘Never’. This ensures that Ubuntu’s
Software Updater programme won’t run unprompted.</li>
  <li>Execute the command <code class="language-plaintext highlighter-rouge">sudo snap refresh --hold</code>. This ensures that applications
installed with the <code class="language-plaintext highlighter-rouge">snap</code> system (including probably Firefox) won’t be upgraded
automatically.</li>
</ul>

<h2 id="step-5b-disabling-grubs-recordfail-timeout">Step 5b: Disabling <code class="language-plaintext highlighter-rouge">grub</code>’s recordfail timeout</h2>

<p>Enabling <code class="language-plaintext highlighter-rouge">overlayroot</code> often causes <code class="language-plaintext highlighter-rouge">grub</code>, Ubuntu’s bootloader, to show itself when
booting and impose a 30-second timeout. If this isn’t desirable for you, just do
the following:</p>

<ul>
  <li>Edit <code class="language-plaintext highlighter-rouge">/etc/default/grub</code>.</li>
  <li>On a new line, below the line that looks like <code class="language-plaintext highlighter-rouge">GRUB_TIMEOUT=0</code>, add
<code class="language-plaintext highlighter-rouge">GRUB_RECORDFAIL_TIMEOUT=$GRUB_TIMEOUT</code>.</li>
  <li>Run <code class="language-plaintext highlighter-rouge">sudo update-grub</code>.</li>
</ul>

<h2 id="step-5c-actually-enabling-overlayroot">Step 5c: Actually enabling <code class="language-plaintext highlighter-rouge">overlayroot</code></h2>

<p>We installed <code class="language-plaintext highlighter-rouge">overlayroot</code> in step 2, so all that is left to do is to enable it.
There is an important caveat to understand when enabling it: both the benefit
and drawback of it is that all new data is lost when the computer is turned off.
This stops the operating system getting corrupted, but it also means that any
and all changes you make to the computer while it is powered up will be lost.
That includes things like changing the URL of your kiosk, configuring a new
Wi-Fi network, tweaking some Ubuntu settings, etc. It’s always possible to
disable <code class="language-plaintext highlighter-rouge">overlayroot</code>, but this requires two reboots (one to disable and one to
re-enable) so I’d strongly suggest making sure you have everything right
<strong>before</strong> enabling <code class="language-plaintext highlighter-rouge">overlayroot</code>.</p>

<p>When you installed <code class="language-plaintext highlighter-rouge">overlayroot</code>, it created a file called
<code class="language-plaintext highlighter-rouge">/etc/overlayroot.conf</code>. Opening it as we did with <code class="language-plaintext highlighter-rouge">/etc/gdm3/custom.conf</code>,
you’ll find a lot of comments explaining the different options available and how
to configure them. At the bottom, you’ll find the line:</p>

<div class="language-sh highlighter-rouge"><div class="highlight"><pre class="highlight"><code><span class="nv">overlayroot</span><span class="o">=</span><span class="s2">""</span>
</code></pre></div></div>

<p>Change this to:</p>

<div class="language-sh highlighter-rouge"><div class="highlight"><pre class="highlight"><code><span class="nv">overlayroot</span><span class="o">=</span><span class="s2">"tmpfs:swap=1,recurse=0"</span>
</code></pre></div></div>

<p>Save the file and reboot. Your file system should now be protected. I’d
recommend checking this by creating a file on the desktop and rebooting. If the
file vanishes, <code class="language-plaintext highlighter-rouge">overlayroot</code> is working!</p>

<h3 id="okay-but-how-do-i-disable-overlayroot"><em>“Okay, but how do I disable <code class="language-plaintext highlighter-rouge">overlayroot</code>?”</em></h3>

<p>In order to make changes to the original file system again, you need to access
the ‘original’ file system and make the necessary changes. This can be done by
executing:</p>

<div class="language-sh highlighter-rouge"><div class="highlight"><pre class="highlight"><code><span class="nv">$ </span><span class="nb">sudo </span>mount <span class="nt">-o</span> remount,rw /dev/sda3
</code></pre></div></div>

<p>Note that the <code class="language-plaintext highlighter-rouge">/dev/sda3</code> part is the name of the disk that you want to
re-mount. It may differ on your system, but you can find the name by running:</p>

<div class="language-sh highlighter-rouge"><div class="highlight"><pre class="highlight"><code><span class="nv">$ </span><span class="nb">df</span> <span class="nt">-h</span>
Filesystem              Size  Used Avail Use% Mounted on
<span class="c"># ...</span>
/dev/sda3                96G   16G   76G  17% /media/root-ro
<span class="c"># ...</span>
</code></pre></div></div>

<p>Look for the entry that’s mounted on <code class="language-plaintext highlighter-rouge">/media/root-ro</code> - most other options will
have names like <code class="language-plaintext highlighter-rouge">tmpfs</code> so it should stick out.</p>

<p>Once you run this command, you will have access to the original file system
again at <code class="language-plaintext highlighter-rouge">/media/root-ro</code>. If the change you want to make is simple, you can
just edit the file(s) directly inside <code class="language-plaintext highlighter-rouge">/media/root-ro</code>, but if not then you
probably want to reboot into writable file system, so you can make the necessary
changes, re-enable <code class="language-plaintext highlighter-rouge">overlayroot</code> and restert. This can be done easily, just by
editing the <code class="language-plaintext highlighter-rouge">overlayroot</code> configuration and rebooting.</p>

<p>The config can now be found at <code class="language-plaintext highlighter-rouge">/media/root-ro/etc/overlayroot.conf</code> - open this
with your text editor to see the same configuration you changed to enable
<code class="language-plaintext highlighter-rouge">overlayroot</code>. You can revert to the original file system by commenting out
(=prepending with <code class="language-plaintext highlighter-rouge">#</code>) the two non-comment lines at the bottom of the file.</p>

<p>Once rebooted, you should find that your changes are persisted again.
Re-enabling <code class="language-plaintext highlighter-rouge">overlayroot</code> is as simple as editing the configuration (now back at
<code class="language-plaintext highlighter-rouge">/etc/overlayroot.conf</code>) and uncommenting the lines you commented out before.
You may wish to leave a note on the desktop to future maintainers so they
understand this and know how to make their changes actually save again!</p>

<h3 id="a-note-on-updates-when-using-overlayroot">A note on updates when using <code class="language-plaintext highlighter-rouge">overlayroot</code></h3>

<p>One of the downsides of using <code class="language-plaintext highlighter-rouge">overlayroot</code> is that it will prevent software
from applying updates. This is not a problem for the most part, except in the
case of security updates. This is not a huge concern for me, as the repair
shop’s kiosk machines aren’t accessing anything particularly private or
mission-critical, but you should evaluate this risk, minimise it as far as
possible and implement an update schedule if necessary.</p>

<h1 id="step-6-boot-upon-receiving-power">Step 6: Boot upon receiving power</h1>

<p>If you want to switch the computer on and off by applying mains power, either
with a manual switch or with a mains timer, you need it to turn on when it
receives power. This is usually a setting in the BIOS; to set it you need to
turn on the computer and repeatedly press a button on an attached keyboard
until the BIOS appears. Typical candidates include F1, F2, F12 and Delete so
if in doubt give those a try.</p>

<p>Look for a setting like ‘Restore on AC’, ‘AC Power Loss’ or ‘After Power Loss’.
It should give you a few options, like ‘power off’, ‘restore previous state’ or
‘power on’. Select ‘power on’, then save and exit the BIOS. Your BIOS settings
are stored separately to your Ubuntu operating system, so you don’t need to
disable <code class="language-plaintext highlighter-rouge">overlayroot</code> for your settings to apply.</p>

<p>If you need help with accessing the BIOS or enabling boot on power on for your
particular machine, the answer can often be found online through a quick web
search.</p>

<h1 id="sources">Sources</h1>

<p>I stole bits and pieces for this article from the following places:</p>

<ul>
  <li><a href="https://askubuntu.com/a/968265">https://askubuntu.com/a/968265</a></li>
  <li><a href="https://spin.atomicobject.com/protecting-ubuntu-root-filesystem/">https://spin.atomicobject.com/protecting-ubuntu-root-filesystem/</a></li>
  <li><a href="https://rex.writeas.com/use-overlay-filesystem-on-ubuntu">https://rex.writeas.com/use-overlay-filesystem-on-ubuntu</a></li>
  <li><a href="https://askubuntu.com/questions/1046979/overlayroot-and-grub2-grub-menu-always-shows">https://askubuntu.com/questions/1046979</a></li>
</ul>]]></content><author><name></name></author><category term="linux" /><summary type="html"><![CDATA[Note: This post was written following my experiences setting up mini-PCs to run my shop window application in the repair shop where I volunteer. The instructions are also applicable to any other situation where you need to boot to a fullscreen browser though.]]></summary></entry><entry><title type="html">How to host serverless Next.js 14+ in AWS</title><link href="https://blog.barnabycollins.com/web-dev/2023/12/22/how-to-host-nextjs-14.html" rel="alternate" type="text/html" title="How to host serverless Next.js 14+ in AWS" /><published>2023-12-22T13:48:00+00:00</published><updated>2023-12-22T13:48:00+00:00</updated><id>https://blog.barnabycollins.com/web-dev/2023/12/22/how-to-host-nextjs-14</id><content type="html" xml:base="https://blog.barnabycollins.com/web-dev/2023/12/22/how-to-host-nextjs-14.html"><![CDATA[<h2 id="introduction">Introduction</h2>

<p>Next.js is a really powerful framework for maximising the performance of a React
frontend. In this post, I’ll share how I used AWS Lambda, S3 and CloudFront to
host it in the cloud. The example given will be for AWS, but is also applicable
to other providers with similar services.</p>

<p>The feature that this guide relies upon is the <a href="https://nextjs.org/docs/pages/api-reference/next-config-js/output#automatically-copying-traced-files">Next.js “standalone” output
mode</a>.
Enabling standalone mode tells Next.js to write only the files you need for
production into the <code class="language-plaintext highlighter-rouge">/.next/standalone/</code> directory. The code in the standalone
build is only what’s needed to generate the content that your Next.js server
returns (predominantly, HTML pages) and excludes all static assets such as
images, compiled JS chunks and stylesheets. The standalone function is really
lightweight, which makes it perfect for serverless hosting.</p>

<p>As the standalone function isn’t designed to serve static assets, we need to
host them elsewhere. In AWS, the obvious product is S3, which is designed
specifically for this task. <a href="https://nextjs.org/docs/pages/api-reference/next-config-js/output#automatically-copying-traced-files">It is
possible</a>
to get your standalone function to serve the static assets directly by copying
the <code class="language-plaintext highlighter-rouge">public/</code> and <code class="language-plaintext highlighter-rouge">.next/static/</code> directories into the <code class="language-plaintext highlighter-rouge">standalone</code> directory,
but this is not recommended as it will increase the size of your serverless
function and make it harder to write different caching rules for static content
and the server-side generated responses that Next.js sends back.</p>

<p>The final major piece of the puzzle is how we route different requests to our
serverless function versus our static content host. Again, AWS CloudFront is
specifically designed for this. CloudFront is a global network of servers that
sits behind your domain name and forwards client requests to your hosts.
Responses can then be cached physically close to your users, which will maximise
the performance of your website.</p>

<p>To summarise, here’s how your frontend will be configured by the end of this
article:</p>

<p><img src="/assets/images/nextjs-diagram.svg" width="600px" /></p>

<p>I should note that this guide assumes that you want both your static assets and
your Next.js function on the same domain. It should be pretty easy to adapt if
you want to have a separate CDN domain for your static assets.</p>

<h2 id="step-1-uploading-your-static-assets-to-s3">Step 1: Uploading your static assets to S3</h2>

<p>After building your Next.js server, you’ll find that you have static assets in
two places:</p>

<ol>
  <li><code class="language-plaintext highlighter-rouge">.next/static/</code></li>
  <li><code class="language-plaintext highlighter-rouge">public/</code></li>
</ol>

<p>The <code class="language-plaintext highlighter-rouge">static</code> directory contains a compiled version of everything inside your
frontend codebase (including media files and client-side code). These are pretty
straightforward to host - we can simply upload them somewhere, and tell Next.js
where they live by providing it with the <a href="https://nextjs.org/docs/pages/api-reference/next-config-js/assetPrefix"><code class="language-plaintext highlighter-rouge">assetPrefix</code> configuration
value</a>.
Whatever you provide as the <code class="language-plaintext highlighter-rouge">assetPrefix</code> will be added to the start of any
reference to your static assets in the HTML that your Next.js function returns.
For example, if Next compiles some image to <code class="language-plaintext highlighter-rouge">/.next/static/myImage.jpg</code>, and you
provide the <code class="language-plaintext highlighter-rouge">https://myhost.com</code> asset prefix, then any HTML that Next.js
generates will refer to your image as
<code class="language-plaintext highlighter-rouge">https://myhost.com/_next/static/myImage.jpg</code>.</p>

<p>The <code class="language-plaintext highlighter-rouge">public</code> directory is a bit more tricky. The things we put in <code class="language-plaintext highlighter-rouge">public/</code> are
generally things that we expect to find at the root of the frontend host. If we
create some file at <code class="language-plaintext highlighter-rouge">public/robots.txt</code>, then we expect to find it at
<code class="language-plaintext highlighter-rouge">https://myfrontend.com/robots.txt</code>. This creates a bit of a conflict with our
Next.js server, because that also needs to live at the root of the frontend
domain.</p>

<p>The easiest way to handle this is to:</p>
<ul>
  <li>Move everything that’s only referred to by frontend code (ie, site media
content) into the <code class="language-plaintext highlighter-rouge">src</code> directory (and thereby into <code class="language-plaintext highlighter-rouge">.next/static</code>)</li>
  <li>Organise anything that remains and that doesn’t need to live directly at the
root into a small number of directories under the root</li>
  <li>Create rules in the CDN for those directories, plus any files that do need to
stay at the root (<code class="language-plaintext highlighter-rouge">robots.txt</code>, favicon, etc)</li>
  <li>Direct everything else to Next.js</li>
</ul>

<p>Configuring this will happen at the end though - for now we just need to get the
static assets uploaded to the S3 bucket.</p>

<p>The way I chose to do this was to copy <code class="language-plaintext highlighter-rouge">.next/static/</code> and <code class="language-plaintext highlighter-rouge">public/</code> to
<code class="language-plaintext highlighter-rouge">/content/[commit-hash]/_next/static</code> and <code class="language-plaintext highlighter-rouge">/content/[commit-hash]/public</code> inside
the bucket respectively. I chose this scheme because:</p>

<ul>
  <li>Using a common prefix (<code class="language-plaintext highlighter-rouge">/content/</code>) allows me to have a single, unchanging CDN
rule for static assets</li>
  <li>Using the commit hash in the path allows for different releases to be
available simultaneously, in case users are using cached HTML content from a
previous version. These releases can also be easily identified in the bucket
(meaning the bucket can be tidied easily). The commit hash is easy to access
in deploy jobs, and makes it easy to trace a set of assets back to a specific
code state. It also would help with <a href="https://javascript.plainenglish.io/what-is-cache-busting-55366b3ac022">cache
busting</a>,
except that Next.js does that already.</li>
  <li>Putting all assets for a particular version inside a single prefix also makes
the bucket easy to manage and tidy.</li>
</ul>

<p>Obviously, though, there are many ways to organise this, each with their own
pros and cons. The rest of this post assumes this scheme, but tweaking the
instructions for your own scheme should be straightforward.</p>

<p>Actually uploading the assets is pretty straightforward - just build your
frontend, and upload your data to the bucket. If you’re using continuous
deployment, the <a href="https://docs.aws.amazon.com/cli/latest/userguide/cli-services-s3-commands.html#using-s3-commands-managing-objects-copy">AWS
CLI</a>
makes this easy.</p>

<p>The bucket really doesn’t need any special configuration at all - all the
defaults are configured appropriately, and it doesn’t need to be public once we
have a CDN. You can make it public temporarily for testing though.</p>

<h2 id="step-2-hosting-nextjs-on-lambda">Step 2: Hosting Next.js on Lambda</h2>

<h3 id="build-and-configuration">Build and configuration</h3>

<p>Hosting web applications on Lambda has one small caveat: when a Lambda function
is invoked, it doesn’t just get passed a HTTP request. The original HTTP request
is actually encapsulated inside an AWS event, which gives us the ability to get
a bit more data about, eg, the service that invoked the Lambda function. The
problem here is that Next.js runs as a server, responding to HTTP requests on a
given port, and therefore has no idea how to handle an AWS event.</p>

<p>Thankfully, AWS provides a handy tool called <a href="https://github.com/awslabs/aws-lambda-web-adapter#aws-lambda-web-adapter">Lambda Web
Adapter</a>.
When a user sends a request to your Next.js server, LWA does the following:</p>

<ul>
  <li>Launch your server if it’s running in a fresh Lambda function</li>
  <li>Poke your server until it responds to requests on the appropriate port</li>
  <li>Once it gets a response from the server, turn the event back into an HTTP
request and pass it into your server</li>
  <li>Return the server’s response back to the service that invoked the function</li>
</ul>

<p>Lambda Web Adapter takes the form of a ‘layer’ that is applied on top of your
function code. We therefore just need to apply the layer and configure it using
environment variables, and it will work nicely.</p>

<p>This is obviously the most AWS-specific part of this process, but it is a common
use case so I would imagine that most hosting providers will offer similar
functionality.</p>

<p>In terms of an entrypoint, Next.js outputs a <code class="language-plaintext highlighter-rouge">server.js</code> file that you can
invoke with <code class="language-plaintext highlighter-rouge">node server.js</code> in order to execute the production server. The
creators of Lambda Web Adapter provide a <a href="https://github.com/awslabs/aws-lambda-web-adapter/blob/main/examples/nextjs-zip/app/run.sh">shell
script</a>
that you can use to actually launch the server.</p>

<p>This script will need to be copied into the <code class="language-plaintext highlighter-rouge">.next/standalone/</code> directory before you compress and upload it to your function.</p>

<h3 id="infrastructure">Infrastructure</h3>

<p>For Next.js, all we need is a fairly standard Lambda function. The main thing it
does need is a function URL (that is, a long public URL that you can use to
invoke it). This is just a tickbox on the function’s configuration, and no
authorisation is needed.</p>

<p>Here is a recommended list of resources that your function will need:</p>

<ul>
  <li>A CloudWatch log group with the name <code class="language-plaintext highlighter-rouge">/aws/lambda/[function-name]</code> (your
function will write to this log group automatically)</li>
  <li>An IAM role with the following:
    <ul>
      <li><a href="https://docs.aws.amazon.com/lambda/latest/dg/lambda-intro-execution-role.html">The AWS Lambda trust
policy</a>
(allows the Lambda service to provide your function runtime with
credentials)</li>
      <li><a href="https://docs.aws.amazon.com/aws-managed-policy/latest/reference/AWSLambdaBasicExecutionRole.html">The Lambda basic execution
role</a>
(allows your function to write logs to CloudWatch)</li>
    </ul>
  </li>
  <li>The Lambda function itself, with the following configuration:
    <ul>
      <li>ZIP package upload; just ZIP up your <code class="language-plaintext highlighter-rouge">.next/standalone/</code> directory</li>
      <li>Handler: Your launch script</li>
      <li>Timeout and memory size of your choice (maybe start at 1024 MB memory and
reduce until you start having issues)</li>
      <li>Node.js runtime (I used <code class="language-plaintext highlighter-rouge">nodejs18.x</code> but use what makes sense to you)</li>
      <li>Architecture: I used <code class="language-plaintext highlighter-rouge">x86_64</code> but I don’t see a reason why <code class="language-plaintext highlighter-rouge">arm64</code> wouldn’t
also work</li>
      <li>Layers: use Lambda Web Adapter - the ARN info can be found in the AWS docs</li>
      <li>Role: your execution role</li>
      <li>Function URL: enabled; no authorisation</li>
      <li>Environment variables:
        <ul>
          <li><code class="language-plaintext highlighter-rouge">AWS_LAMBDA_EXEC_WRAPPER</code>: <code class="language-plaintext highlighter-rouge">"/opt/bootstrap"</code>
            <ul>
              <li>required by LWA</li>
            </ul>
          </li>
          <li><code class="language-plaintext highlighter-rouge">PORT</code>: [some integer]
            <ul>
              <li>tells Next.js which port to host your application on - <a href="https://github.com/awslabs/aws-lambda-web-adapter#configurations">avoid ports 9001
and
3000</a>
as these are used by AWS services</li>
            </ul>
          </li>
          <li><code class="language-plaintext highlighter-rouge">AWS_LWA_PORT</code>: [some integer]
            <ul>
              <li>tells LWA what port to look for your server on; should be the same as
your <code class="language-plaintext highlighter-rouge">PORT</code></li>
            </ul>
          </li>
          <li><code class="language-plaintext highlighter-rouge">RUST_LOG</code>: <code class="language-plaintext highlighter-rouge">"info"</code>
            <ul>
              <li>tells LWA what log level to use; change this if you need to
troubleshoot. Possible values
<a href="https://docs.rs/env_logger/0.10.1/env_logger/#enabling-logging">here</a>.</li>
            </ul>
          </li>
        </ul>
      </li>
    </ul>
  </li>
</ul>

<p>You can find more info on AWS LWA configuration
<a href="https://github.com/awslabs/aws-lambda-web-adapter#lambda-functions-packaged-as-zip-package-for-aws-managed-runtimes">here</a>.
You may wish to enable gzip compression on your responses by setting
<code class="language-plaintext highlighter-rouge">AWS_LWA_ENABLE_COMPRESSION</code> to <code class="language-plaintext highlighter-rouge">true</code>.</p>

<p>With your function configured, you should find that you can reach your function
by copying its URL into your browser. If you’ve made your static assets bucket
public and given the server a correct <code class="language-plaintext highlighter-rouge">assetPrefix</code> then you should even be able
to see your frontend fully-formed at this stage. Make sure that you upload the
same standalone server build as the one that you took the static assets from -
Next.js generates different file names on every build for cache busting
purposes, so non-matching assets and server code will result in missing assets.</p>

<h2 id="step-3-caching--routing">Step 3: Caching &amp; Routing</h2>

<p>The final step is to use CloudFront to sit between your users and your deployed
frontend. The main thing we’ll use CloudFront for is to route different requests
to different places (Next.js vs the static assets bucket), but it’s possible to
do loads of clever stuff with its caching and firewall options too.</p>

<p>When configuring a CloudFront distribution, there are two concepts that should
be understood:</p>

<ul>
  <li>An origin is a thing that CloudFront can point requests to. For our purposes,
the two origin resources will be Next.js and the static assets host.</li>
  <li>A cache behaviour describes a rule that CloudFront should follow when serving
a certain set of routes under your URL. It allows you to map a set of routes
to an origin, and specify how that origin’s responses should be cached.</li>
</ul>

<p>Before we make the CloudFront distribution itself, there are a few final things
to configure:</p>

<ul>
  <li>An Origin Access Control (OAC) for the static assets bucket. This configures
how we allow CloudFront to talk to the bucket. For more information, see
<a href="https://docs.aws.amazon.com/AmazonCloudFront/latest/DeveloperGuide/private-content-restricting-access-to-s3.html">here</a>.</li>
  <li>An IAM policy which allows the CloudFront service to access the static assets
bucket. See the <a href="https://docs.aws.amazon.com/AmazonCloudFront/latest/DeveloperGuide/private-content-restricting-access-to-s3.html">OAC
docs</a>
for details on what the policy should look like. Remember to attach the policy
to the bucket.</li>
  <li>An Origin Request Policy (ORP), with a query string behaviour of <code class="language-plaintext highlighter-rouge">all</code>. This
policy, when applied, will tell CloudFront to forward URL query strings. We
need this in order to receive query strings in our Next.js server.</li>
</ul>

<p>So, we need a CloudFront distribution with the following configuration. I assume
your domain name is in AWS Route 53, but this is not a requirement - some
Googling should yield you some advice on how to configure it if you’re not using
R53.</p>

<ul>
  <li>Alias: Your frontend domain</li>
  <li>Price class: Choose the most appropriate one for your use case (list
<a href="https://docs.aws.amazon.com/AmazonCloudFront/latest/DeveloperGuide/PriceClass.html">here</a>)</li>
  <li>Certificate: Use an appropriate certificate here. It’s possible to register a
free public certificate with AWS Certificate Manager (ACM) - <a href="https://docs.aws.amazon.com/acm/latest/userguide/acm-services.html">docs
here</a></li>
  <li>Origins:
    <ol>
      <li>One origin pointed at the Next.js server’s function URL.</li>
      <li>One origin pointed at the static assets bucket, using the OAC mentioned above.</li>
      <li>One origin pointed at the <code class="language-plaintext highlighter-rouge">/content/[commit-hash]/public</code> prefix in the
static assets bucket, also using the OAC mentioned above.
        <ul>
          <li>This is needed in order to map the <code class="language-plaintext highlighter-rouge">public</code> directory to the root of our
 frontend domain. It needs to be updated with each release.</li>
        </ul>
      </li>
    </ol>
  </li>
  <li>Cache behaviours (in ascending order of precedence):
    <ul>
      <li>As many behaviours as you need: point some file or directory at origin 3
(the current <code class="language-plaintext highlighter-rouge">public</code> directory). Caching enabled.</li>
      <li>One behaviour: point <code class="language-plaintext highlighter-rouge">/content/*</code> at origin 2 (the root of the static assets
bucket). Caching enabled.</li>
      <li>Default behaviour: point to origin 1. No caching (we want the website to
update straight away when we update our Next.js function). Apply the ORP
mentioned above.</li>
    </ul>
  </li>
</ul>

<p>You’ll also need to configure the DNS for your domain to point to the correct
CloudFront addresses. If you have your domain name in AWS Route 53, <a href="https://docs.aws.amazon.com/Route53/latest/DeveloperGuide/routing-to-cloudfront-distribution.html#routing-to-cloudfront-distribution-config">this is
easy</a>.
Otherwise, you can <a href="https://stackoverflow.com/a/65028375">create an alias
record</a>, pointed at the correct CloudFront
URL.</p>

<p>Finally, make sure you’ve set the asset prefix on your Next.js function to use
the correct path. This is briefly explained at the start of the static assets
section above - but, in short, the value you provide should look like
<code class="language-plaintext highlighter-rouge">https://myfrontend.com/content/[commit-hash]</code>.</p>

<p>Once all this is configured and deployed, your frontend should be working! The
last thing you might want to do is set up a serverless function or cronjob that
clears out old releases from your static assets bucket every so often. I won’t
go into detail on that here though, as this guide is focussed on getting the
basic infrastructure in place.</p>]]></content><author><name></name></author><category term="web-dev" /><summary type="html"><![CDATA[Introduction]]></summary></entry><entry><title type="html">Sound tech basics for DJs</title><link href="https://blog.barnabycollins.com/live-events/2023/05/02/sound-tech-for-djs.html" rel="alternate" type="text/html" title="Sound tech basics for DJs" /><published>2023-05-02T15:48:00+00:00</published><updated>2023-05-02T15:48:00+00:00</updated><id>https://blog.barnabycollins.com/live-events/2023/05/02/sound-tech-for-djs</id><content type="html" xml:base="https://blog.barnabycollins.com/live-events/2023/05/02/sound-tech-for-djs.html"><![CDATA[<p>Welcome to my first blog post in a while. This one is aimed at DJs, and should
cover the basic technical knowledge and skills that are needed to run a dance
music event.</p>

<p>I’m going to start by explaining how sound signals actually work, before
explaining the signal flow through a typical DJ setup, and finally briefly
covering acoustics.</p>

<h2 id="audio-signals">Audio signals</h2>

<h3 id="what-an-audio-signal-actually-is">What an audio signal actually is</h3>

<p>For the purpose of this post, I’m going to portray sound signals using waves.
You’re probably familiar with waves already from your library preparation
software or any production experience you already have, but I’ll go a bit deeper
on what the wave actually means now.</p>

<p>These plots are simple - on the x-axis is time, and on the y-axis is air
pressure. So, essentially, you can think of a sound wave as just a plot of a
speaker diaphragm’s position over time. If the line at a particular point is
high, the speaker diaphragm will be ‘pushed out’ at that time when playing back
the sound. If the line at a particular point is low, the speaker diaphragm will
be ‘pulled in’. The inverse is true for the diaphragm of a microphone when you
record something - the microphone diaphragm converts movement to voltage.</p>

<p>Speaker diaphragms are moved by strong electromagnets at their centres, which
convert voltage into movement. So, when we transmit audio through a speaker, the
electromagnet is converting a high voltage to a pushing out force on the speaker
diaphragm, and a low voltage to a pulling in force on the speaker diaphragm.</p>

<p>So, a typical sound wave might look like this:</p>

<iframe src="https://www.desmos.com/calculator/2aeoaedz8u" style="min-height:200px" width="100%"></iframe>

<p>There are five things that define a signal: its channel count, its level,
whether it’s analogue or digital, the connector it uses, and whether or not it’s
balanced. Balanced audio is important in live music, but less important for DJs,
so I’ll talk about the first four now and skip balanced audio until the end of
the article.</p>

<h3 id="audio-channels">Audio channels</h3>

<p>An audio channel is really just a single fluctuating voltage. In DJing, all
signals have either one channel or two channels. A signal with one channel is
‘mono’, and a signal with two is ‘stereo’.</p>

<p>Stereo music is just music with a left and a right channel, designed to match
the left and right ears on a typical person. The two separate channels can play
completely separate sounds in theory, but they generally play similar things
with minor variations intended to give the track some ‘width’.</p>

<p>For example, the volume of a particular component of a track can be varied
between the left and right channels to choose where it sounds like it’s coming
from - if it’s stronger in the left channel than the right channel, then it
sounds like it’s physically slightly left of centre.</p>

<p>Converting from mono to stereo is pretty straightforward - if we have a mono
track to be split into stereo, we simply play the same mono signal on both
channels (resulting in no particular width).</p>

<p>Converting from stereo to mono involves a process called ‘summing’ - the two
signals are simply added together. For example, these two signals:</p>

<iframe src="https://www.desmos.com/calculator/hxtcmzwoyd" style="min-height:400px" width="100%"></iframe>

<p>sum to make:</p>

<iframe src="https://www.desmos.com/calculator/77z3t4gpmu" style="min-height:200px" width="100%"></iframe>

<p>Almost all modern tracks are produced in stereo, so if you have a stereo speaker
system it’s generally preferable to ensure that the signal chain is stereo all
the way.</p>

<h2 id="signal-levels">Signal levels</h2>

<p>One thing to be aware of is the concept of a signal ‘level’. A signal’s level is
essentially just its strength. Common signal levels include:</p>

<ul>
  <li>Line level
    <ul>
      <li>This is a standardised signal level, designed for sending audio signals
between mains-powered devices.</li>
      <li>It’s a medium-strength signal.</li>
      <li>‘Consumer’ and ‘pro’ equipment have slightly different standards for
line-level audio, but these standards are generally compatible if you don’t
push your volume too high.</li>
    </ul>
  </li>
  <li>Mic level
    <ul>
      <li>This is the level that a mic might produce.</li>
      <li>It’s generally very weak.</li>
      <li>It is not standardised, and varies depending on microphone design.</li>
    </ul>
  </li>
  <li>Phono level
    <ul>
      <li>This is the level that a turntable (aka ‘phonograph’) cartridge produces.</li>
      <li>It’s also very weak, and varies depending on the particular cartridge model.</li>
      <li>Phono signals are quite interesting so will be elaborated on later.</li>
    </ul>
  </li>
  <li>Speaker level
    <ul>
      <li>This is the voltage that is fed into a speaker’s diaphragm.</li>
      <li>It needs to have a high enough voltage to physically move a speaker cone
through the air.</li>
      <li>It’s therefore much stronger than line level.</li>
    </ul>
  </li>
</ul>

<p>In general, signals start off weak at the source and get stronger as they
progress through a signal chain from sound source to speaker.</p>

<p>In case you hadn’t guessed, signal strengths are increased by amplifiers.
Microphone and phono signals are generally increased to line level by dedicated
amps called called ‘pre-amplifiers’ or pre-amps. Pre-amps are placed as early as
possible in the signal chain - so any mic/phono input on a mixer will naturally
have a pre-amp built in behind the connectors. Line level inputs don’t need
pre-amps though, for obvious reasons.</p>

<h2 id="analogue-vs-digital">Analogue vs digital</h2>

<p>So, we’re familiar with analogue signals. Next up, digital signals. I won’t go
into too much details, but essentially a digital signal turns a sound system
into a series of numbers rather than as a wiggly line on, say, a vinyl record.</p>

<p>It checks what the signal’s voltage is (or ‘samples’ it) several tens of
thousands of times a second, and uses those numbers to describe the signal. A
device playing back a digital signal simply joins the dots back up. You might
think that the ‘steppyness’ of a digital signal would affect the sound, but a
low-pass filter and some clever maths called the Nyquist–Shannon theorem
actually means that a digital signal is capable of perfectly describing any
analogue signal, provided that there is an upper limit on the frequencies we try
to recreate. Humans are physically unable to hear frequencies above 20kHz, so
this limitation is fine. Devices that convert between digital and analogue are
called digital to analogue converters, or DACs - I’ll leave it to you to guess
what an ADC does.</p>

<p>In general, digital audio is better than analogue audio - it is immune to
interference and capable of carrying multiple channels down a single cable.</p>

<p>There is a separate analogue/digital discussion, unrelated to the audio signals
that connect your devices together - that of analogue and digital DJ mixers.
Analogue mixers such as Allen &amp; Heath’s Xone line are fully analogue, meaning
that your audio signals travel through the whole mixer without any digital
signal processing (DSP). However, the effects units in modern mixers are built
on DSP - so these mixers do not include effects past EQ and filters (which can
be easily recreated with analogue circuitry).</p>

<h2 id="audio-connectors">Audio connectors</h2>

<p>You’ve probably noticed that there are several different ways of sending audio
between devices. I’m going to quickly cover the common audio connectors now.</p>

<p>I’m going to mention balanced audio in this section, so if you’re not sure what
that is, balanced signals are less prone to interference. I’ll expand on
balanced audio a bit more later on.</p>

<h3 id="analogue-rca">Analogue RCA</h3>

<p><img src="/assets/images/rca.jpg" height="200px" /></p>

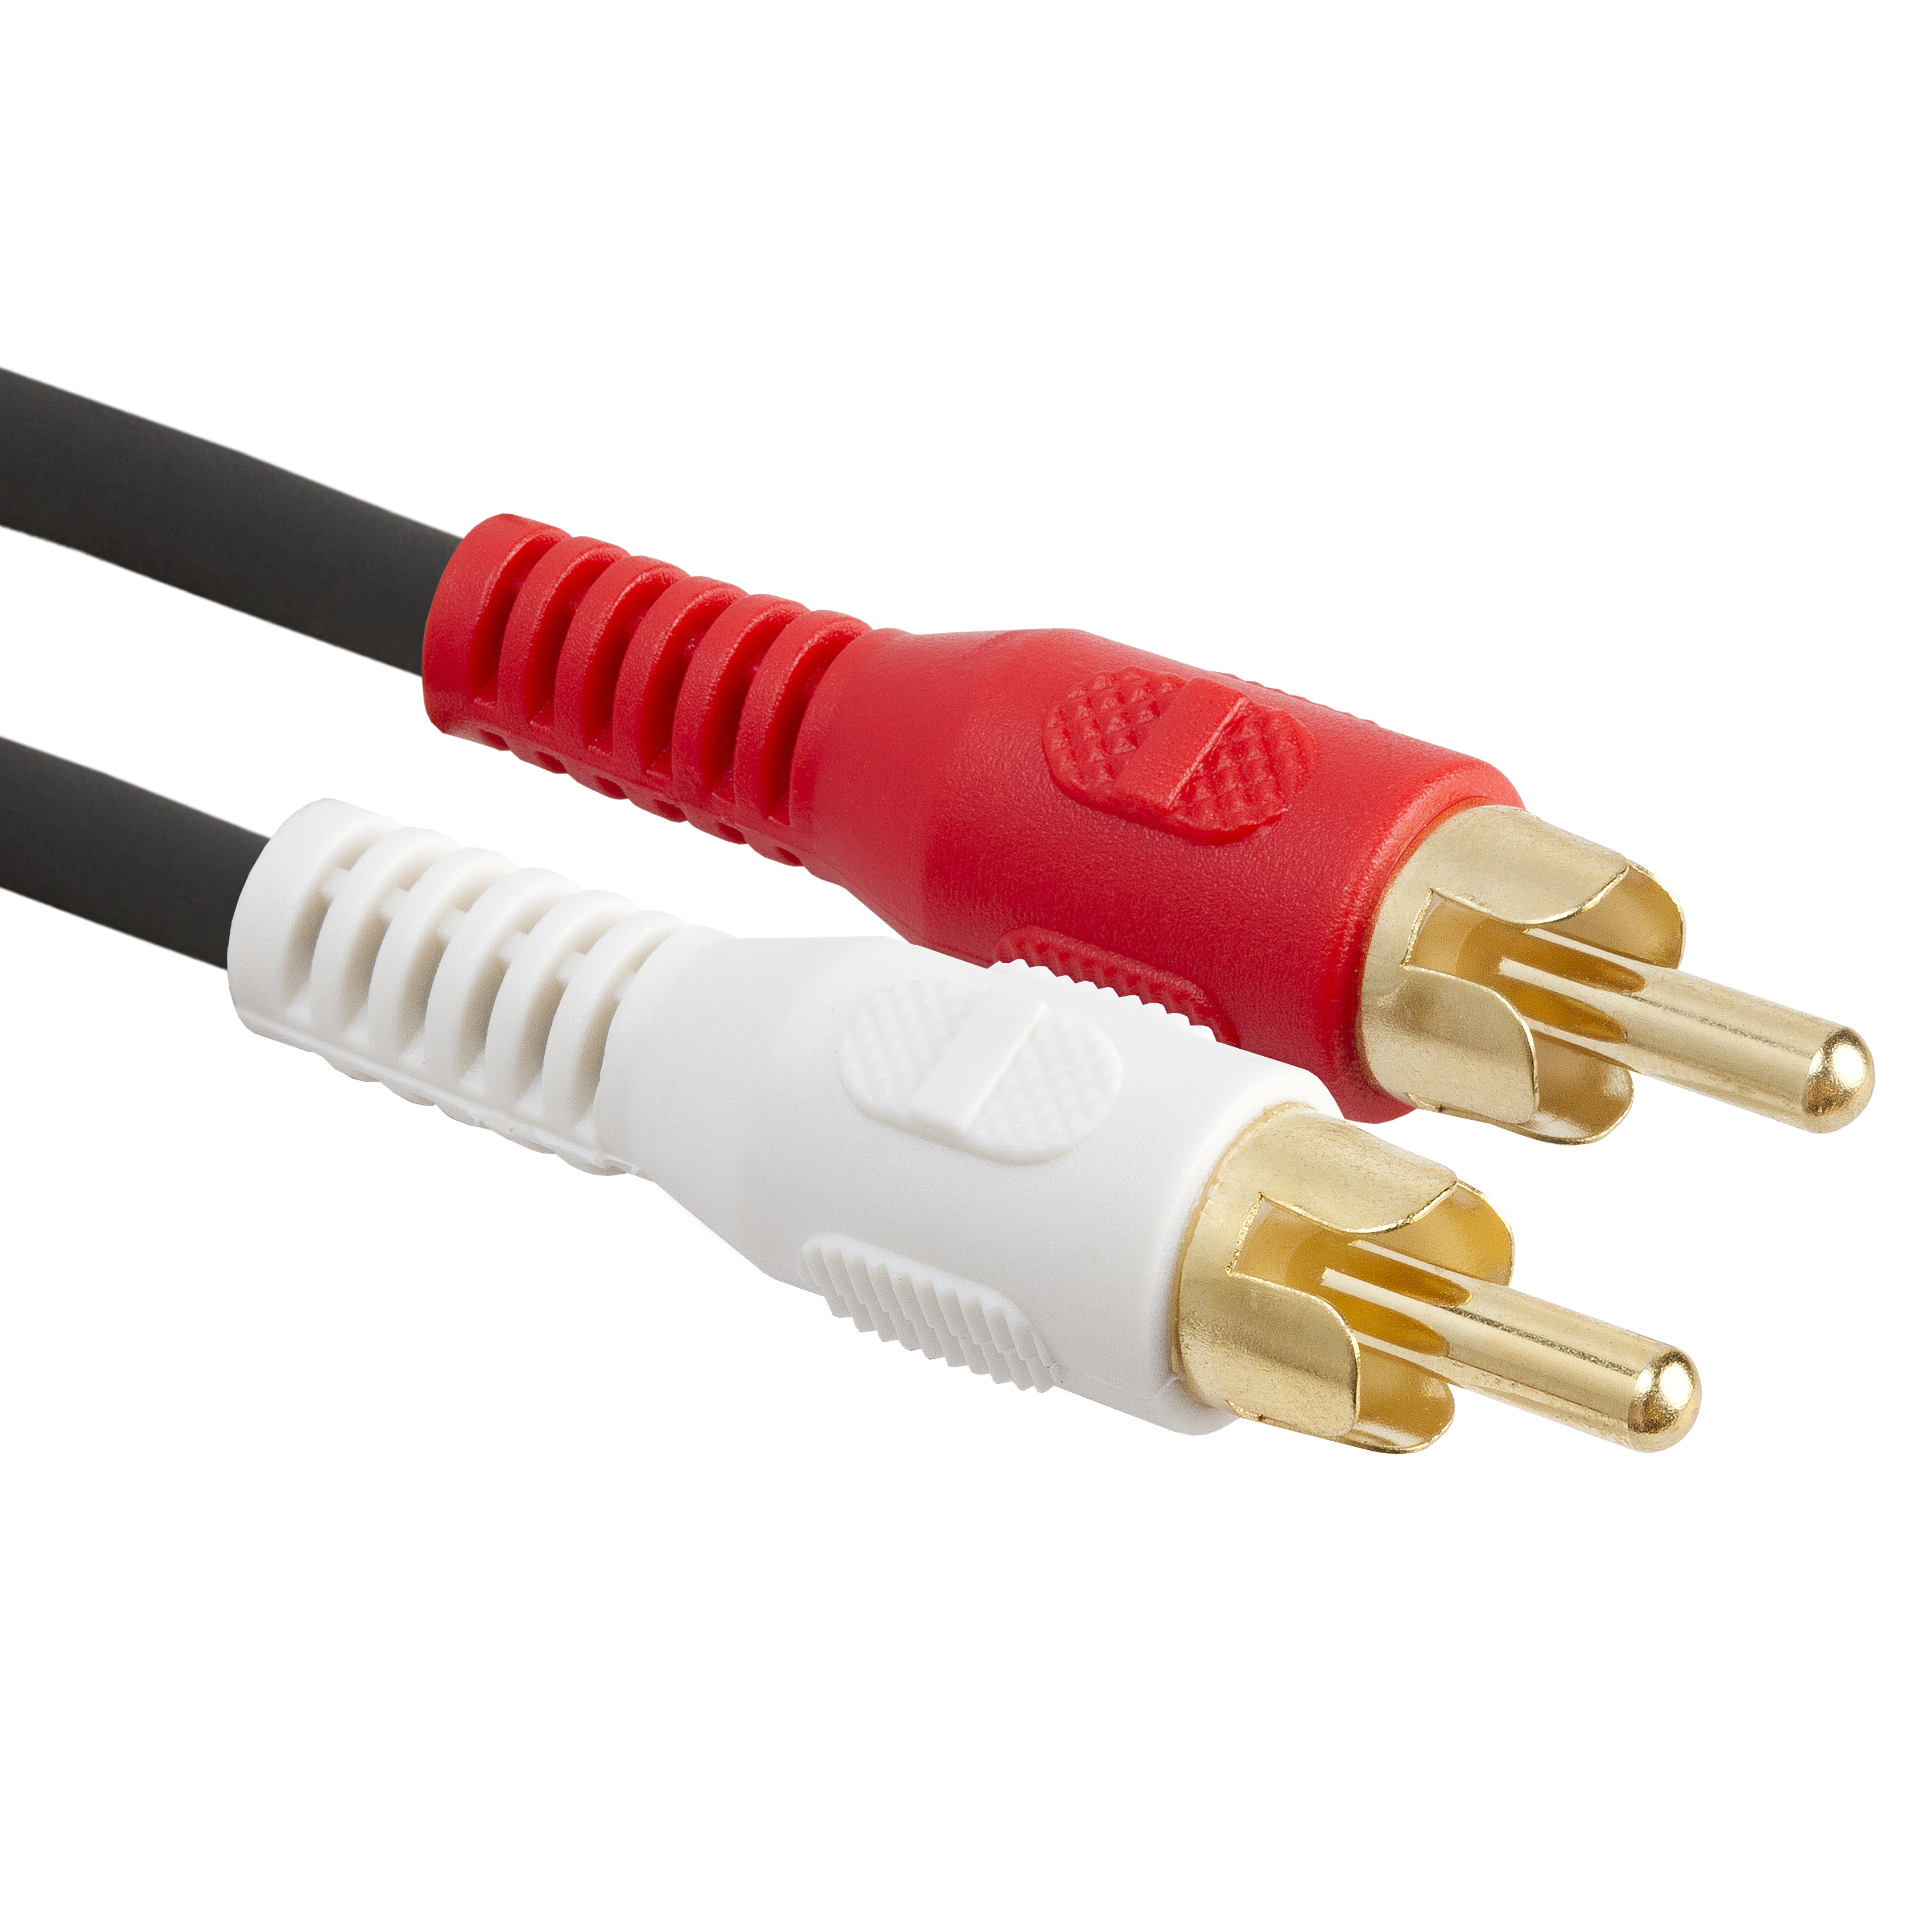
<p>Most commonly used to connect DJ players to mixers, the RCA cable carries the left
and right channels at line-level along two separate cables. White is left and
red is right, and the signals carried by RCA are unbalanced.</p>

<p>RCA is easy to accidentally unplug, and sometimes has connection issues -
particularly if you’re using cheap plugs. Cheap RCA connectors with
‘flower’-shaped ends (see the four ‘petals’ around the central pin in the image
above) are bad, as they can be bent out of shape easily, resulting in a loose
connection. Connectors with outer rings that fully surround the centre pin are a
better pick if you have the choice.</p>

<h3 id="spdif-digital-rca">S/PDIF (Digital RCA)</h3>

<p><img src="/assets/images/spdif.jpg" height="200px" /></p>

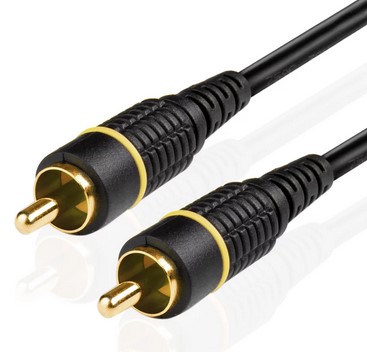
<p>The digital connectors on CDJs and/or mixers use a protocol called S/PDIF to
transmit digital audio through RCA cables. If your mixer and CDJs both support
it, it’s generally preferable as it minimises the number of conversions between
analogue and digital that take place between your USB stick and the master
output.</p>

<p>In all physical aspects, digital RCA is identical to analogue RCA, so the cables
are fully interchangeable.</p>

<h3 id="xlr">XLR</h3>

<p><img src="/assets/images/xlr.jpg" width="200px" /></p>

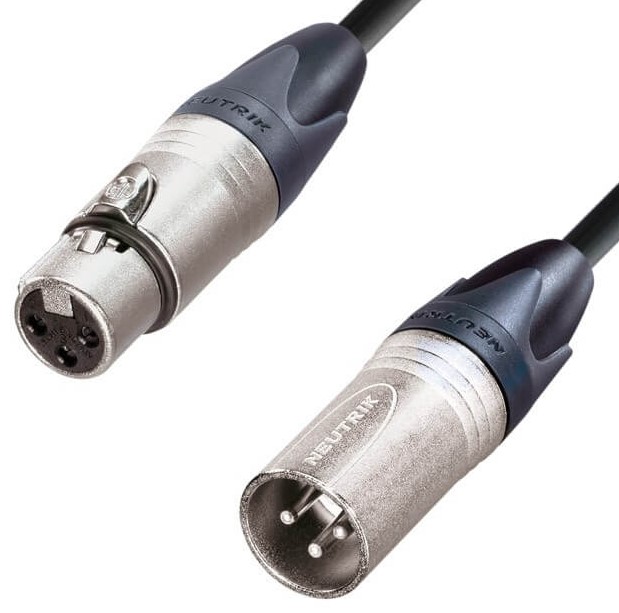
<p>XLR cables are the industry standard way of moving audio around, for good
reason. XLR commonly carries both mic and line-level audio, and is balanced
thanks to the presence of a third pin (more on that later). It also has locking
connectors, meaning you can’t yank it out without pushing a button on the input
side - though the mic inputs on the back of DJ mixers often don’t feature a
lock.</p>

<p>It also has different connectors on each end, which means multiple XLRs can be
daisy-chained to produce a single longer cable. The upper ‘female’ connector
with the button plugs into outputs, and the lower ‘male’ connector plugs into
inputs.</p>

<p>XLR cables are expensive, but good quality cables are worth it for their
reliability. Bad quality connectors typically feel light or hollow in the hand,
whereas good quality connectors feel more solid and are made with tougher
materials. The above connectors are the good kind - the XLR standard was
designed by Neutrik and their plugs are still generally thought to be the best.</p>

<h3 id="635mm-14">6.35mm (1/4”)</h3>

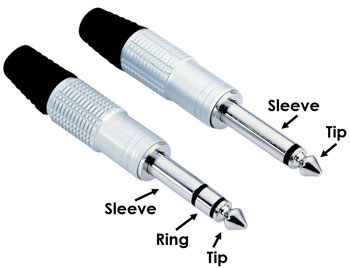
<p><img src="/assets/images/ts-vs-trs.jpg" width="200px" /></p>

<p>Otherwise known as ‘big jacks’, or just ‘jacks’, quarter-inch cables come in two
varieties - TRS on the left, and TS on the right. The difference between the two
is simply that TRS has one more pin - this is usually used either to send stereo
signals, or to send balanced audio like with XLR’s third pin.</p>

<p>TRS connectors are generally preferable wherever possible, as balanced audio is
less susceptible to interference. However, TS is also commonly used,
particularly for guitars, guitar pedals and production gear. If a 1/4”
connection doesn’t clearly state that it’s balanced, it’s more likely to be
unbalanced (but if in doubt the product manual will usually make clear which it
is).</p>

<p>In DJ situations, TRS cables are most commonly used for connecting the mixer to
the booth monitor speaker, but they can also be used for connecting mics or as
master outputs on some mixers. Both of these scenarios usually use balanced
audio, so TRS cables are definitely preferable.</p>

<p>The only exception is the send/return loops on mixers, which are typically
unbalanced. If you’re fancy enough to be using the send-return loop, you
probably don’t need TRS, but it may be worth checking the manual for your effect
unit and/or mixer.</p>

<p>Plugging TRS into a TS socket (or vice versa) won’t break anything, particularly
if the TRS is being used for balanced - it’s pretty idiot proof. However, if you
do happen to be using TRS for stereo instead of balanced audio, you may lose the
right channel - in most electronic music this isn’t the end of the world, but
it’s probably preferable to sum left and right to mono if you can. Bear in mind
that most DJ mixers offer the option to output in mono - either through a switch
on the front, or in a configuration menu.</p>

<p>In terms of quality, similar rules apply to XLR.</p>

<h4 id="speaker-level-635mm">Speaker-level 6.35mm</h4>

<p>Note that TS 1/4” cables are commonly also used for connections from amplifier
to speaker, particularly on very cheap passive systems. You should not use regular,
line-level TS cables for this, as a speaker level signal requires the cable to
transmit more power than a typical line-level cable is designed for.</p>

<p>If in doubt, look at the writing on the cable - if it says ‘microphone cable’ or
‘instrument cable’ then it’s not appropriate for high-power signals. If it
mentions ‘speaker cable’ then it should be fine. A speaker cable will be
noticeably thicker and heavier than a line-level cable.</p>

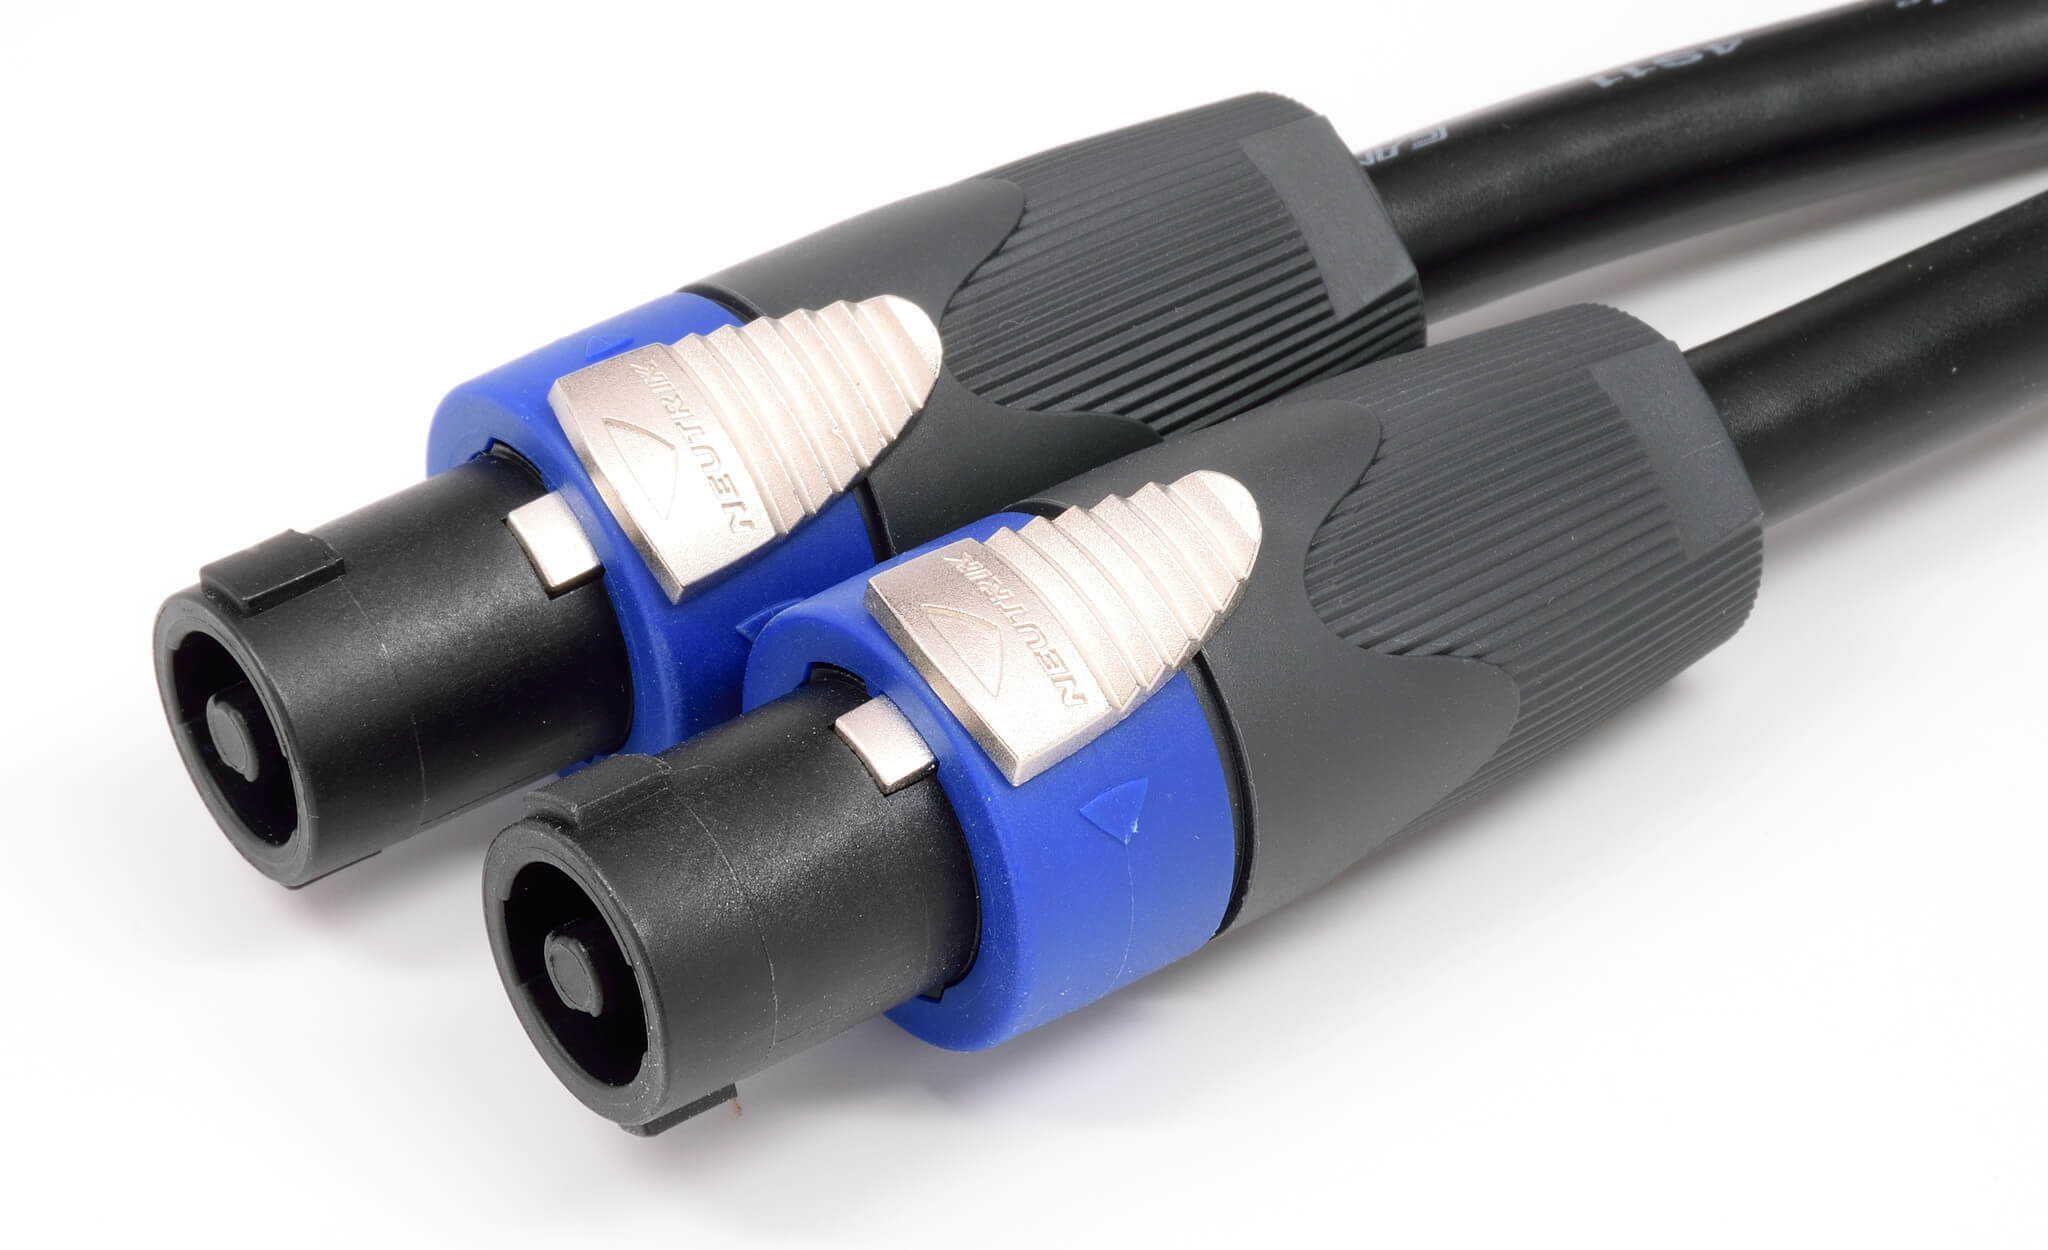
<h3 id="speakon">speakON</h3>

<p><img src="/assets/images/speakon.jpg" width="200px" /></p>

<p>Much like XLR, speakON is a type of cable designed by Neutrik specifically for
live scenarios. It’s built to carry speaker-level signals, but is much better
suited to the job than jack cables. It has locking connectors, meaning it can’t
be yanked out accidentally, can carry more power and is generally more reliable.</p>

<p>Plugging in or unplugging a speakON cable for the first time can be a confusing
experience, so bear in mind that you have to line up the (differently-sized)
protrusions on the connectors, insert it, then twist it. The lock should have
clicked into place. To unplug, just find and pull back the lock on the male
connector and reverse the steps.</p>

<h2 id="advanced-sound-tech">Advanced sound tech</h2>

<h3 id="phono-signals-and-riaa-equalisation">Phono signals and RIAA equalisation</h3>

<p>Vinyl records come with a few specific challenges for mastering engineers and
listeners. There are two that are particularly interesting here: firstly, the
needle can easily skip, particularly when playing back loud bass frequencies.
Secondly, louder low ends require more physical space on the disc. Finally,
records famously have a certain level of hiss and crackle when playing back,
which tend to occupy the higher frequencies.</p>

<p>A technique called RIAA equalisation neatly solves both of these problems.
Essentially, before it is cut into the record surface, a track is equalised in
much the same way you’re used to on DJ mixers. The high frequencies are boosted,
and the low frequencies are cut. Then, when the record is played back, the highs
are cut and the lows are boosted to compensate. This is done with a standardised
EQ curve defined by the Recording Industry Association of America in the 1950s.</p>

<p>The benefits here are two-fold: by reducing the level of the bass on the record,
we reduce the space needed and the likelihood of skipping. Separately, boosting
the high-end means that the high frequencies in the actual recorded music have
an advantage against the high frequencies created by hissing and crackling as
the needle travels through the groove.</p>

<p>The important thing to note here is that a signal coming from a turntable needs
equalising before it will sound correct. This is a built-in feature of pretty
much all phono preamps, so you shouldn’t need to worry about it, but certainly
always make sure you’re connecting turntables to inputs that expect phono
signals - failure to do this will result in a thin-sounding signal.</p>

<h3 id="balanced-audio">Balanced audio</h3>

<p>In order to transmit an electrical signal, we need two metal connections. One
way of understanding this fact is that, given we’re building an electrical
circuit, the signal needs to flow ‘through’ the device on the receiving end. If
there was only one connection, the electrons wouldn’t have anywhere to go. This
is true, obviously, but an analogy that makes life a bit simpler when talking
about audio signals is to think of each connection as transmitting a certain
voltage level.</p>

<p>Under this simplification, the reason we need two ‘poles’ to transmit a signal
is because, as well as the actual voltage of the signal, we also need a
‘reference’ level so we have something to compare to, also known as the
‘neutral’. The property that decides how far the speaker moves is the difference
between the two voltages. We can call the reference level 0V, and the actual
signal might oscillate between +3V and -3V, for example.</p>

<p>Here’s the above signal again, with the neutral voltage added in in green:</p>

<iframe src="https://www.desmos.com/calculator/ux4ivanhv7" style="min-height:200px" width="100%"></iframe>

<!-- ## A sidenote

This system is good because it's normal for the voltages in electric devices to
fluctuate. There are many possible sources of this, including electromagnetic
interference, or even just some noise stemming from the 50Hz oscillation of
mains power in a particular device. If the neutral voltage on the sending device
is actually fluctuating between +1V and -1V, then that could be added to an
audio signal travelling through that device. But the neutral wire allows us to
compensate for it, because that same fluctuation will be present on the neutral
wire of the connection. Since we're looking for the difference between the
voltages, we get the signal that we want.

So, even if our two voltages are doing this...

<iframe src="https://www.desmos.com/calculator/2npjnrvpyn" style="min-height:200px" width="100%"></iframe>

...we get a resulting signal that looks like this:

<iframe src="https://www.desmos.com/calculator/wna588sirl" style="min-height:200px" width="100%"></iframe> -->

<p>So, let’s imagine that we’re sending audio down a cable in the way described
above. All is going well, until something near the cable causes some
interference (represented in orange):</p>

<iframe src="https://www.desmos.com/calculator/stwizvbbjn" style="min-height:200px" width="100%"></iframe>

<p>Interference is a common problem, particularly with weak signals such as those
from mics. It can be caused by a whole range of devices and effects, and one
cable could even induce voltage into another if run close to it for some
distance. This interference will be audible in the reproduced sound, and
probably won’t be very enjoyable for an audience to experience.</p>

<p>We have no way of stopping this under the current setup. But balanced audio
gives us a solution. We add a second signal, and we flip it. Now, if we get
interference, it affects both signals equally:</p>

<iframe src="https://www.desmos.com/calculator/6ca4ji9cmd" style="min-height:200px" width="100%"></iframe>

<p>This may not seem that useful, but the clever bit is what happens at the
receiving end of the signal.</p>

<p>The device receiving the signal flips the second signal back over again, giving
us two signals:</p>

<iframe src="https://www.desmos.com/calculator/tvghptgepg" style="min-height:400px" width="100%"></iframe>

<p>It then adds the two signals together…</p>

<iframe src="https://www.desmos.com/calculator/qzkmewx6h5" style="min-height:200px" width="100%"></iframe>

<p>cancelling the interference out entirely:</p>

<iframe src="https://www.desmos.com/calculator/ctpukppvdc" style="min-height:200px" width="100%"></iframe>

<p>So, essentially, balanced audio adds a second signal (and therefore a third pole
to the cable) and makes the signal travelling through that cable much more
resilient to interference.</p>

<h3 id="building-your-own-cables">Building your own cables</h3>

<p>One of the huge benefits of pro audio cables is that they can be disassembled and
re-soldered with relative ease. If you’re skilled at soldering, or interested in
giving it a go, it’s usually cheaper to buy cable and connectors separately and
construct your cables yourself. It also gives you the skills to repair almost all
audio cable faults yourself, and is very rewarding.</p>

<p>Most cables designed for pro audio (XLR, TRS, SpeakON, etc) can be disassembled in
this way - usually by unscrewing the metal or plastic ‘boot’ at the rear of the
connector.</p>]]></content><author><name></name></author><category term="live-events" /><summary type="html"><![CDATA[Welcome to my first blog post in a while. This one is aimed at DJs, and should cover the basic technical knowledge and skills that are needed to run a dance music event.]]></summary></entry><entry><title type="html">Choosing an orchestral recording setup</title><link href="https://blog.barnabycollins.com/recording/2022/03/11/choosing-orchestral-recording-setup.html" rel="alternate" type="text/html" title="Choosing an orchestral recording setup" /><published>2022-03-11T15:48:00+00:00</published><updated>2022-03-11T15:48:00+00:00</updated><id>https://blog.barnabycollins.com/recording/2022/03/11/choosing-orchestral-recording-setup</id><content type="html" xml:base="https://blog.barnabycollins.com/recording/2022/03/11/choosing-orchestral-recording-setup.html"><![CDATA[<p>Okay, so you’re probably here because you need to record a large group of
musicians. Before I get into the concrete setup guide, I’m going to go over a
little bit of the theory.</p>

<p>Chances are that your group are performing in a lovely big echoey room. The
recording is inevitably going to capture some of that sound, which is good. But
as nice as the reverb is, it’s also important to make sure that you get a good
clear recording with a good amount of sound coming directly from the instruments
themselves. In order to achieve this, the sweet spot is generally to place the
microphones at the front of the group, probably just behind the conductor, and
reasonably high up (at least 2m!). It’s a good idea to err on the side of being
closer, because it’s easy to add more reverb and (pretty much) impossible to
take it away.</p>

<p>One of the other main considerations is stereo width. Put simply, we have two
ears, and some techniques are going to give you ‘wider’ signals (that is,
signals with more differences between the two ears) than others. In a vacuum,
more stereo width is a good thing because it sounds nice, but it shouldn’t come
at the cost of things sounding natural.</p>

<p>For these orchestral recordings, you generally want a faithful reproduction of
the sound with minimal colouration and high fidelity even in quiet sections.
You’re also probably not using the microphones for amplification, so feedback
won’t be an issue. For this reason, you’re almost certainly going to use
condenser microphones. These microphones are perfect for the job, but it’s worth
you knowing that condensers need ‘phantom power’. This is when the microphone
cable not only carries the audio from the mic back to the recorder but also
carries 48V in the opposite direction to polarise the microphone’s diaphragm.</p>

<p>I’m also going to need to briefly discuss ‘phase’ and the problems it can cause.
Basically, imagine a nice sine wave coming from your sound source:</p>

<blockquote>
  <p><img src="https://upload.wikimedia.org/wikipedia/commons/c/cd/Wave_sine.svg" alt="Sine wave" /></p>

  <p>Waveforms.svg: Omegatron; Derivative work: MrLejinad, CC BY-SA 3.0
<a href="https://creativecommons.org/licenses/by-sa/3.0">https://creativecommons.org/licenses/by-sa/3.0</a>, via Wikimedia Commons</p>
</blockquote>

<p>Now let’s say you’ve got two microphones receiving that sine wave. All good. But
what if they’re slightly different distances from the sound source? Then each
mic would be receiving the wave in a different ‘phase’: that is, that one
microphone is picking up a ‘peak’ as the other is at the bottom of a ‘valley’.</p>

<p>This isn’t a major problem in and of itself, but it becomes more of an issue if
your microphones get added together later on. In a basic situation, this is most
likely to happen if you have a left mic and a right mic - in this case it will
play back fine, except if someone listens to your recording in mono (that is, on
a device with only one speaker). This might happen on a phone speaker, for
example.</p>

<p>When two sounds get ‘summed’ together, what we’re essentially doing is averaging
the y-axis of those two waves at each point. When our signals are out of phase,
that means that a peak will average with an exactly opposite valley, giving
us… zero. That means that the wave will cancel itself out, meaning anything at
that frequency will magically vanish when summed to mono. In practice, this will
happen at a number of frequencies, creating a ‘harsh’ and ‘unnatural’ sound. See
<a href="https://youtu.be/kneNsn65EBg?t=47">this video</a> for an example.</p>

<p>Finally, there are two main kinds of ‘pickup pattern’ to discuss. A microphone’s
pickup pattern defines what directions it is sensitive to incoming sound from. A
‘cardioid’ microphone is most sensitive to things in front of it and tends to
‘reject’ sound from behind it, whereas an ‘omnidirectional’ microphone picks up
sound (pretty much) equally from all directions.</p>

<h1 id="step-0-choose-your-microphone-setup">Step 0: Choose your microphone setup</h1>
<p>Next up, you need to think about what physical setup you’re going to use. Since
this guide is primarily written for people that are borrowing equipment from
Music Durham, I’m going to focus on the equipment that we have. That doesn’t
mean it’s not applicable to other equipment too though!</p>

<p>There are a few main options in terms of how you set up the microphones. In
general, you want your main microphones to all be in one place to reduce phase
issues and to make the recording sound more natural (since someone sitting in
the room would be sitting in one place too - they wouldn’t have ears spread
around the room). You’ll get the “best” sound just behind (and/or above) the
conductor, so that’s where you want to put your main microphones! As a general
rule, 3-4m off the ground is a pretty good sweet spot as it means sound won’t be
blocked by things like musicians or the conductor but is still reasonably close
to the performers.</p>

<p>For a bigger orchestra (or more professional recording), you may also want to
place ‘outrigger microphones’ either side of centre to capture sound from the
wider fringes of the orchestra, but I’m not going to discuss this here.</p>

<h2 id="xy-stereo">XY Stereo</h2>
<blockquote>
  <p><img src="https://upload.wikimedia.org/wikipedia/commons/1/1d/XY_stereo.svg" alt="XY Stereo diagram" /></p>

  <p>By Iainf 23:51, 21 September 2007 (UTC) - self-made; based on Image:XY-Stereo.png and
Image:Cardioidpattern.svg, CC BY-SA 3.0,
https://commons.wikimedia.org/w/index.php?curid=2792301</p>
</blockquote>

<p>This is one of the most foolproof options. Basically, XY stereo places two
microphones on top of each other, pointing approximately 90 degrees apart,
either side of the centre line. The mics need to be cardioid, or you’d just be
listening to the same point in space twice! At Music Durham, we have a pair of
Rode M5 microphones that are perfect for XY stereo.</p>

<p>Pros:</p>
<ul>
  <li>Very difficult to set up wrong</li>
  <li>No phase issues</li>
  <li>Only needs one mic stand</li>
  <li>Only needs two mics (and two channels on your recorder)</li>
  <li>Angle can be adjusted to suit the width of the ensemble</li>
</ul>

<p>Cons:</p>
<ul>
  <li>Not much stereo width (you’re only reliant on the difference in the
microphones’ pickup patterns)</li>
  <li>May miss the centre of the group if the mics are angled too wide</li>
</ul>

<h2 id="ab-stereo">AB Stereo</h2>
<p>While useful for recording individual performers or instruments, AB stereo tends
not to be that popular for larger recordings due to its potential for phase
issues and prominent perceived ‘gap’ in the centre. The idea is essentially to
place two microphones either side of the centre line, so that they each pick up
one half of the group.</p>

<p>The problem with AB stereo for larger recordings is that you want your mics to
be far apart to avoid phase problems. However, by placing them far apart you’ll
also lose the centre of the group. This tradeoff is something that will always
need to be overcome with AB stereo, hence its lack of use in orchestral
recording. When recording a single instrument, it’s much easier to be closer to
the sound source, meaning the mics can pick up the centre easily without causing
as much phase cancellation.</p>

<p>Pros:</p>
<ul>
  <li>Simple to set up</li>
  <li>Can use cardioid or omnidirectional mics (research this first though as they
will sound very different!)</li>
  <li>Stereo concept makes logical sense</li>
  <li>Very wide sound</li>
</ul>

<p>Cons:</p>
<ul>
  <li>You’re always going to have to compromise between limiting phase cancellation
and not missing out on the centre</li>
</ul>

<h2 id="decca-tree">Decca Tree</h2>
<p>Named after Decca Records, the British record label who invented it, the Decca
Tree is not only a hugely popular choice in capturing orchestral groups but also
can be used in a range of other applications, particularly choral recordings.
It’s based on an AB stereo technique, but with the addition of a centre mic to
fill the hole in the centre, and positioned more centrally rather than being
spaced across the front.</p>

<p>This technique uses three omnidirectional mics, positioned in a roughly
equilateral triangle with about 2m side length, at the front of the group.</p>]]></content><author><name></name></author><category term="recording" /><summary type="html"><![CDATA[Okay, so you’re probably here because you need to record a large group of musicians. Before I get into the concrete setup guide, I’m going to go over a little bit of the theory.]]></summary></entry><entry><title type="html">Executing orchestral recordings</title><link href="https://blog.barnabycollins.com/recording/2022/03/03/setting-up-orchestral-recordings.html" rel="alternate" type="text/html" title="Executing orchestral recordings" /><published>2022-03-03T14:48:00+00:00</published><updated>2022-03-03T14:48:00+00:00</updated><id>https://blog.barnabycollins.com/recording/2022/03/03/setting-up-orchestral-recordings</id><content type="html" xml:base="https://blog.barnabycollins.com/recording/2022/03/03/setting-up-orchestral-recordings.html"><![CDATA[<p>Once you know what setup you’re using, setting up an orchestral recording is
pretty straightforward.</p>

<h1 id="step-0-making-sure-you-have-everything-you-need">Step 0: Making sure you have everything you need</h1>
<p>Here’s a quick checklist of what you will want to bring:</p>
<ul>
  <li>Microphones</li>
  <li>Microphone stands</li>
  <li>Recording setup (probably just a portable recorder)</li>
  <li>Means of getting mains power to your recorder (probably a USB charger)</li>
  <li>Battery power for your recorder (just in case)</li>
  <li>XLR cables</li>
  <li>Wired headphones to monitor the signal</li>
  <li>(Maybe) a laptop to retrieve the recordings</li>
  <li>Cable covers and/or tape to avoid trip hazards</li>
</ul>

<h1 id="step-1-positioning-everything">Step 1: Positioning everything</h1>
<p>Once all the equipment is in the venue, the first order of business is to figure
out where you’re going to put your recorder. You want it to be somewhere safe,
preferably with power so you don’t have to rely on batteries, and in a spot that
minimises trip hazards as well as being reasonably close to the microphones.</p>

<p>Once the recorder is placed, you need to place your microphones. When placing
microphones, remember that you are essentially deciding where a listener’s
‘ears’ are going to end up when they hear the recording. As such, where you
place them will greatly affect what the recording sounds like. Typically the
best spot is just at the front of the ensemble (just behind the conductor, if
applicable, is usually a good rule of thumb), and at least 2 metres in the air.</p>

<h2 id="case-1-xy-stereo">Case 1: XY Stereo</h2>
<blockquote>
  <p><img src="https://upload.wikimedia.org/wikipedia/commons/1/1d/XY_stereo.svg" alt="XY Stereo diagram" /></p>

  <p>By Iainf 23:51, 21 September 2007 (UTC) - self-made; based on Image:XY-Stereo.png and
Image:Cardioidpattern.svg, CC BY-SA 3.0,
https://commons.wikimedia.org/w/index.php?curid=2792301</p>
</blockquote>

<p>In the case of XY stereo, your two microphones should be placed on a short bar,
such that they point inwards and cross over maybe 5-10mm from their ends (one
above the other). They should be roughly at right angles, but this can be
tweaked depending on how wide your ensemble is and/or how far away it is.</p>

<h2 id="case-2-decca-tree">Case 2: Decca Tree</h2>
<blockquote>
  <p><img src="https://upload.wikimedia.org/wikipedia/commons/4/48/Decca_Tree.svg" alt="Decca Tree diagram" /></p>

  <p>By Iainf 00:30, 23 September 2007 (UTC) - public domain,
https://commons.wikimedia.org/wiki/File:Decca_Tree.svg</p>
</blockquote>

<p>The centre microphone should be placed somewhere around the conductor (probably
just behind), and the side microphones should be placed either side of it, a
fair distance behind it. There isn’t any particular rule for this, but
microphone manufacturer Schoeps recommend putting mics at least 1.5m apart to
reduce phase issues, so around 2m spacing is probably a safe bet. You may want
to adjust the dimensions a little based on your situation though - if the group
is reasonably small or narrow then maybe shrink the triangle a little, and if
it’s quite wide then you could move the left and right mics further out.</p>

<h1 id="step-2-plugging-it-all-in">Step 2: Plugging it all in</h1>
<p>Once you’ve decided where your mics are going you’re ready to put them on the
stands, plug them in and raise them to 3-4m (in that order)! If they’re
omnidirectional you probably want to point them either up or forwards (to not
look silly), whereas with cardioid mics you need to be more careful to get them
oriented correctly. If you’re using Music Durham’s tall mic stands (which are
K&amp;M 20800s), just raise them to the top of the stand’s range - this should put
your mics around 3.1m in the air.</p>

<p>When choosing cables, remember that you’re going to need at least 3m just
to get from the mic to the floor, so you’ll probably want more than 5m unless
your recorder is basically at the foot of the mic stand.</p>

<p>Run the cables to the recorder, using cable covers or tape to stop them becoming
trip hazards where necessary, and plug them in. I usually plug them into
channels 1-3 in the order L, C, R but you could also do L, R, C if you want!
Just remember which one you go for.</p>

<h1 id="step-3-setting-up-the-recorder">Step 3: Setting up the recorder</h1>
<p>If you’re using a Music Durham recorder, visit its page on the <a href="https://durhamtech.org.uk/musicdurham/items#recording-production">Music Durham
Tech Team
catalogue</a> to
download its manual and/or quick start guide. The process varies between
recorders but here’s a quick checklist of things to do:</p>
<ul>
  <li>Make sure there’s an SD card with plenty of space inside the recorder
    <ul>
      <li>It will typically tell you how much recording time you have left before you
run out of space on the recording screen</li>
    </ul>
  </li>
  <li>Make sure the recorder is receiving power so you’re not relying on batteries
    <ul>
      <li>You might need to tell it to use the USB input for power when you turn it on
- this might appear as a ‘bus power’ option</li>
    </ul>
  </li>
  <li>Set the recording settings - 48kHz WAV at 24-bit is generally a good bet!</li>
  <li>Make sure phantom power is on; without this you won’t get any signal from your
mics!
    <ul>
      <li>Phantom power is often switched on with a physical button or switch so if
you’re struggling to find it have a look around the recorder’s body</li>
    </ul>
  </li>
  <li>Turn off any pad switches</li>
  <li>Set the gain, with the following process:
    <ul>
      <li>Ask the group to sing/play at maximum volume for around a minute</li>
      <li>For each channel, adjust the volume until it’s just maxing out at -10 dB</li>
    </ul>
  </li>
  <li>Plug in a pair of wired headphones if possible and monitor the signal to make
sure there aren’t any issues</li>
</ul>

<h1 id="step-4-record">Step 4: Record</h1>
<p>Start your recording! If recording a concert, your best bet is probably to set
it off just before the concert starts. I’d suggest pausing the recording for any
intervals etc as there’s no point recording those, but don’t do that if you’re
worried you’ll forget to resume it again!</p>

<h1 id="step-5-edit">Step 5: Edit</h1>
<p>Once you’re done recording, grab your recordings off the SD card by either
plugging it directly into a computer or connecting the recorder over USB with
the SD card installed.</p>

<p>If you’re okay mixing your recordings yourself, import your recordings into a
digital audio workstation; as a minimum I’d suggest you do the following:</p>
<ul>
  <li>Set a low-cut (aka high-pass) filter at a minimum of 50 Hz to eliminate
unnecessary sub-bass frequencies</li>
  <li>Pan your left and right signals all the way to their respective sides</li>
  <li>Set the gain of all your signals so they peak at around -6 dB at the loudest
point of the recording</li>
  <li>If you used a Decca Tree, choose an appropriate mix between the centre mic and
side mics
    <ul>
      <li>Make sure you’re using stereo speakers or headphones so you can appreciate
the width properly</li>
      <li>The centre mic is intended to ‘fill in the gap’ between the side mics, so if
in doubt start with only those and bring up the centre mic until things
sound balanced</li>
    </ul>
  </li>
  <li>Set the master gain so your recording peaks just below zero at the loudest point</li>
</ul>

<p>You may also want to use a small amount of mastering compression and EQ, but
only do this if you know what you’re doing, and keep it minimal to preserve the
natural sound of your recordings.</p>]]></content><author><name></name></author><category term="recording" /><summary type="html"><![CDATA[Once you know what setup you’re using, setting up an orchestral recording is pretty straightforward.]]></summary></entry><entry><title type="html">How to plan a successful (and minimally stressful) live event</title><link href="https://blog.barnabycollins.com/admin/2022/02/28/planning-successful-events.html" rel="alternate" type="text/html" title="How to plan a successful (and minimally stressful) live event" /><published>2022-02-28T10:27:00+00:00</published><updated>2022-02-28T10:27:00+00:00</updated><id>https://blog.barnabycollins.com/admin/2022/02/28/planning-successful-events</id><content type="html" xml:base="https://blog.barnabycollins.com/admin/2022/02/28/planning-successful-events.html"><![CDATA[<p>Let’s say you’re planning an event. This can be a tricky and complicated
business, but it can be streamlined. This article is intended to help you
simplify the planning process as much as possible, such that on-the-night
logistical stress is minimised and everyone knows exactly what’s supposed to be
happening. The #1 takeaway here is to <strong>plan early</strong> and <strong>collect information
first</strong>, but I’ll go into more detail on good processes to follow below!</p>

<p>I should note that I am writing this from the perspective of a sound technician
that has worked on a wide range of events at Durham University, so a lot of the
specifics will be geared towards that niche, but the general process outlined
here is applicable to more or less any event. Essentially, your job as an event
organiser is to act as a central party who communicates with all the involved
stakeholders, collects all the information needed to run the event in one place
and ensures everyone knows what’s going on.</p>

<h1 id="step-1-establish-what-you-have-at-the-venue">Step 1: Establish what you have at the venue</h1>
<p>Probably the first step of planning an event is to decide on a venue. This could
be anything from a small local bar to a literal castle, but what they all have
in common is that they will provide you with a certain base level of equipment
for your event, as well as obviously the space(s) that it will take place in. In
all likelihood, they will invite you to the location to have a look around, and
this is the ideal time to discuss the first thing you need to know: what exactly
they have. Bring a clipboard!</p>

<p>First off, make sure to start a conversation about what exactly comes with your
booking - it may be that they will only provide power, or it may be that they
have loads of lighting, a stage and a speaker system. Knowing this in advance
will make life easier for technicians (as they won’t need to bring or set up
equipment if it’s already in the room) and cheaper for you (as you won’t need to
hire equipment that doesn’t get used because it’s already in the room). It will
also ensure that there aren’t any gaps - everyone will be clear on who is
providing what. While the representative from the venue will probably talk
through it in person, and noting down these things is good, it might be worth
asking for the list to be forwarded over email too, so you have this important
information straight from the horse’s mouth.</p>

<p>As well as a list of the tech that comes with your booking, it’s also useful to
draw up a quick map of the area’s expected layout. This might seem unnecessary,
but remember that the people setting up the event probably haven’t visited the
venue and therefore won’t have the insight that you do. As well as things like
the room shape, stage area and table locations, it’s very important to show the
locations of all power outlets and any other equipment that the venue is
providing. It’s best to do this either whilst at the venue or straight after
your visit to ensure that it’s fresh in your mind. I told you the clipboard
would come in handy.</p>

<h1 id="step-2-establish-what-your-performers-need">Step 2: Establish what your performers need</h1>
<p>Next up, you’re probably going to get in touch with some people to provide
entertainment at your event. Once you have people confirmed, get a rider from
(or at least confirm technical requirements with) <strong>every single one</strong>. That
includes dancers, speakers, photographers, karaoke machine providers and
unicyclists. You may find that many of them want little things like background
music, a green room or a power socket. Having all of this noted down ensures
that there won’t be any surprises on the day when your extreme juggler suddenly
remembers he needs 24 speakers, a DJ, a light show and an inflatable water slide
for his death-defying performance in the middle of a field, 6 miles from the
nearest electrical outlet.</p>

<p>You will also want to chat with the performers about when they want to come to
the venue. It’s likely that they will want to come and figure out layout,
execute soundchecks, and rehearse, and getting their timings down early will
make planning the day’s logistics that much easier.</p>

<p>Obviously, riders are particularly important from musical performers, dancers
and other stage-based acts, so make sure they get them sent over ASAP.
Otherwise, you’ll have to chase them for riders when your technician asks for
them in a few days’ time and you’ll lose a day or two of planning time while
they get back to you. If you need something to point to, I have a
<a href="/admin/2022/02/01/how-to-write-a-band-rider.html">handy blog post</a>
on that very subject.</p>

<h1 id="step-3-establish-what-you-want">Step 3: Establish what you want</h1>
<p>Now comes the fun bit. You have all the information at your fingertips, so have
a think about what kind of production value you want your event to have. If
you’re technically inclned, have a look at various tech hires (if you’re
Durham-based, the best place to start is
<a href="https://durhamtech.org.uk">durhamtech.org.uk</a>), see what’s on offer and compare
against your budget. If you’re not technically inclined, though, don’t worry!
It’s still useful to think about how much you’re willing to spend - as a guide
(at Durham college hire prices), a ‘basic’ setup (with minimal lighting, 1-2
main speakers, a mixer etc) will cost around £70 + VAT, a more advanced setup
(with stage monitors, slightly more lighting and a digital mixer) will cost
£150 + VAT and a really fancy setup (with posh lighting, nice light and sound
desks and maybe some staging) will cost £200+.</p>

<p>These numbers will also vary depending on how much your performers are
bringing - a band that brings their own amplifiers and drumkit will obviously
need less hire spend than one that doesn’t. Remember also that you’ll probably
want at least one technician, and these should charge £15-30 per hour. Finally,
while it may seem like needless spending to hire out nicer equipment that will
only service your technicians and band (things like nicer mixers or more stage
monitors) these things will allow those people to perform better: as an example,
pricier digital mixers feature really handy features like compressors and
wireless control that will allow a technician to really fine-tune the sound
versus a more basic analogue mixer.</p>

<p>You might want to establish contact with some technicians at this point, to make
them aware of the fact that you’re interested in hiring equipment for your
event, but you will probably want to wait before you send all of the information
over, since there are a few more things to tie together.</p>

<h1 id="step-35-transport--logistics">Step 3.5: Transport &amp; logistics</h1>
<p>By this point, you’ve probably also established what transport you’re using. As
well as transport for your bands, guests etc, you may need to move technicians
and equipment to and from your event too. As a very rough guideline (again, at
Durham college hire prices), a small car will carry around £70-100 worth of
equipment. If you have coaches, obviously those will be capable of carrying much
more.</p>

<p>The other thing to consider at this step is things like rehearsals, setup and
soundchecks. Put simply, the longer you can leave between the start of setup and
the start of the event, the more time there is to iron out any bumps in the road
that crop up. If you’ve done all the above then those bumps are far, far less
likely to appear, but there’s nothing wrong with planning for contingency, and
allowing more time will allow everyone to get things exactly how they should be
for your event.</p>

<p>Once you’ve got all of this planned out, write up a rough initial schedule for
the day. Include everything from vehicles going back and forth to soundchecks
and setup time. It’s nice to have things planned out in your head, but getting
it down on paper will mean you have a nice table you can send to everyone
involved and thereby reduce logistical miscommunication.</p>

<p>I’ve put this step as a half-step because it’s something that you’ve probably
been working on at the same time as the above things - between step 3 and 4 is
sort of the ‘deadline’ to have these details planned out (though it shouldn’t be
100% finalised until after step 4, just in case there are any complications).</p>

<h1 id="step-4-fill-in-the-gaps">Step 4: Fill in the gaps</h1>
<p>Notice that actually hiring technicians and equipment is the last step. That’s
because by this point you should have all the information that a technician will
need in order to plan and execute your event. That means all you really need to
do is send everything over in one go. If you’ve been thorough, it may well be
that the person on the other end goes <em>“Okay cool. You need this, this, this and
this and that will probably cost you somewhere in the region of £120”</em> with no
further back-and-forth needed. This is the ideal outcome, but it’s also very
possible they have one or two minor things to clarify with you first.</p>

<h1 id="step-5-relax">Step 5: Relax!</h1>
<p>Congratulations! By this point everyone involved in your event knows exactly
what’s going on. You’ll probably want to circulate final arrangements with
everyone involved in order to ensure that everyone knows the situation, but
otherwise your event is all planned out! Have a cup of tea and reflect on how
awesome you are.</p>

<p>As a bit of an epilogue, I’m just going to quickly draw attention to what the
alternative to this process is. As tempting as it may seem to get in touch with
the people providing you with technicians and equipment first so they can help
you through the process, sending emails back and forth with every new thing is a
waste of your and their time. You would essentially be acting as a go-between,
and they would have to go through the above and talk to performers/venue through
you. That’s not your job or their job, and giving them the contact details for
the other parties so they can liase directly cuts you out of the loop entirely,
meaning there’s potential for things like spending decisions to be made without
your consent. I should note that emailing technicians early to confirm that you
would like to use their services is a perfectly reasonable thing to do, but you
should make it crystal clear that you are collecting information in the
background and will get back to them once you have it all in one place.</p>]]></content><author><name></name></author><category term="admin" /><summary type="html"><![CDATA[Let’s say you’re planning an event. This can be a tricky and complicated business, but it can be streamlined. This article is intended to help you simplify the planning process as much as possible, such that on-the-night logistical stress is minimised and everyone knows exactly what’s supposed to be happening. The #1 takeaway here is to plan early and collect information first, but I’ll go into more detail on good processes to follow below!]]></summary></entry><entry><title type="html">How to write a useful technical band rider</title><link href="https://blog.barnabycollins.com/admin/2022/02/01/how-to-write-a-band-rider.html" rel="alternate" type="text/html" title="How to write a useful technical band rider" /><published>2022-02-01T18:25:00+00:00</published><updated>2022-02-01T18:25:00+00:00</updated><id>https://blog.barnabycollins.com/admin/2022/02/01/how-to-write-a-band-rider</id><content type="html" xml:base="https://blog.barnabycollins.com/admin/2022/02/01/how-to-write-a-band-rider.html"><![CDATA[<p>If you’re reading this, chances are you’ve been asked to write a rider for the
first time, and you’re not sure what you’re supposed to be doing. A rider is a
crucial part of making sure a gig goes smoothly, so here’s how to write a good
one (from a technician’s perspective)!</p>

<p>I’ve included a range of different things here; if you’re a small band
performing in a small gig then you probably won’t need much more than the first
table below when constructing your rider.</p>

<p>One last thing before I get started - please don’t forget to be nice! It’s
possible to be professional and precise without sacrificing personality and
friendliness :)</p>

<h1 id="equipment-list">Equipment list</h1>

<p>The first thing you’ll need is to make it clear who’s in your band, what they
play, what they have and what they need. A good way of laying this out is in a
table, like this:</p>

<blockquote>
  <table>
    <thead>
      <tr>
        <th>Performer</th>
        <th>Instrument</th>
        <th>Provided equipment</th>
        <th>Required equipment</th>
      </tr>
    </thead>
    <tbody>
      <tr>
        <td>DJ Khaled (he/him)</td>
        <td>Bass kazoo</td>
        <td>Bass kazoo, high stool</td>
        <td>Instrument mic (Shure SM57 or similar)</td>
      </tr>
      <tr>
        <td>Rick Astley (he/him)</td>
        <td>Electric guitar</td>
        <td>Electric guitar, refusal to give you up</td>
        <td>Guitar amplifier (min. 50W)*, amp mic / DI</td>
      </tr>
      <tr>
        <td>Squidward (they/them)</td>
        <td>Casio RAP-1 Rapman</td>
        <td>The world’s 1st rap keyboard</td>
        <td>1x mains power socket, 3.5mm mono output</td>
      </tr>
      <tr>
        <td>Queen Elizabeth II (she/her)</td>
        <td>Vocals, didgeridoo</td>
        <td>Telefunken M80 Gold microphone, gold-plated mic stand</td>
        <td>Instrument mic for didgeridoo, crown storage*</td>
      </tr>
    </tbody>
  </table>

  <p>(*: can be provided if necessary)</p>
</blockquote>

<p>Make sure to include less obvious items on this list, and state their purpose so
technicians get an idea of what’s needed and how it all fits together! These
items may include:</p>
<ul>
  <li>Pedals / pedalboards</li>
  <li>Tables &amp; seating</li>
  <li>Music stands</li>
  <li>Mic stands (if you have specific needs in this area)</li>
  <li>Power sockets (and what will need to be plugged into them)</li>
</ul>

<p>If you have preferences don’t be afraid to state those too, but bear in mind
that smaller-scale events and venues will only have limited tech selections.</p>

<h2 id="bonus-points">Bonus points</h2>

<p>Bonus points are available for:</p>
<ul>
  <li>Listing the number of mixer channels used by each person</li>
  <li>Being specific on the setup of more complicated instruments like drum kits</li>
  <li>Including exact models of any electronic equipment you do bring</li>
  <li>Noting anywhere that condenser mics or DIs will be needed (this way the
technician knows where to send phantom power)</li>
</ul>

<p>Also, there’s no such thing as too much detail - even if you’re, eg, running a
MIDI keyboard into a synth, or you like to have your laptop nearby to keep an
eye on a recording, mentioning that will only stop there being any unpleasant
surprises during the event. Plus, many technicians will be interested to see how
you’re applying tech to make cool noises come out of their speakers!</p>

<h1 id="other-technical-information">Other technical information</h1>

<p>This is where you’d add any info about technical requirements that aren’t
covered in the main equipment list. For example, you could describe the setup
you use for monitoring (eg if you have your own IEM rack), or if there are any
non-standard things to be aware of. If you’re really pro, have your own
technician/mixer and/or you’re the only band performing at that event, you can
even list the mixer channels you use for each instrument to be super clear on
what’s needed.</p>

<p>You can also use this section to specify things like whether individual members
want their own specific monitor feeds (and whether they want personal control
over them), what kinds of effects you might want on the sound, and if you have
any preferences for the speaker or mixing setup. If there is a specific sound
you’re after, providing sound clips is a good idea!</p>

<p>Finally, it may be handy to provide a set list for more formal events,
particularly if you expect your tracks to vary in, eg, instrumentation, or
desired sound. It will also help technicians understand the structure and length
of your performance.</p>

<h1 id="stage-plan">Stage plan</h1>

<p>It’s common, particularly with more professional bands and venues, to send over
a rough map of the stage. It’s not essential for smaller gigs, particularly when
you’re one of several bands sharing the same stage at a small event, but if your
band is particular about how things should be set up it’s a great way of
communicating that in advance.</p>

<p>You don’t strictly need to include actual people, because those will (in a
normal event at least) not be placed by technicians, but you should include:</p>
<ul>
  <li>Drum kits, keyboards and other static instruments</li>
  <li>Stage monitors</li>
  <li>Amplifiers</li>
  <li>Any other static equipment you might be bringing yourselves (eg, IEM racks or
pedalboards)</li>
  <li>Places that need to be left unblocked for movement on stage (not strictly
necessary but possibly useful if your band moves around a lot)</li>
  <li>Places where you need power - bonus points for
    <ul>
      <li>specifically marking out spots to leave extension leads</li>
      <li>noting the number of plugs that will be required in each location</li>
      <li>noting any power-hungry (&gt;100W) devices that might need plugging in
(generally these are devices with speakers, but also may include computers,
large displays, lights or heating appliances)</li>
    </ul>
  </li>
</ul>

<p>You can also depict items you expect technicians to provide, such as DIs or
stageboxes, if you like - but it may be easier to leave positions of these items
up to them as they probably know the space better than you do.</p>

<h1 id="other-things-to-mention">Other things to mention</h1>

<p>Finally, you may want to mention a few final things to make sure you get what
you need at the event. Things to consider include:</p>
<ul>
  <li>Room to prepare for your performance or store equipment during the event</li>
  <li>Soundcheck requirements &amp; expectations</li>
  <li>Special access requirements for equipment or people</li>
</ul>

<p>And finally, one of the most important things to provide is contact details for
someone who will be able to answer any queries relating to your rider or your
performance. An email and phone number would ideally be provided, and it’s nice
to include your band’s social media links too.</p>]]></content><author><name></name></author><category term="admin" /><summary type="html"><![CDATA[If you’re reading this, chances are you’ve been asked to write a rider for the first time, and you’re not sure what you’re supposed to be doing. A rider is a crucial part of making sure a gig goes smoothly, so here’s how to write a good one (from a technician’s perspective)!]]></summary></entry><entry><title type="html">Hello there 👀</title><link href="https://blog.barnabycollins.com/meta/2022/01/31/hello-there.html" rel="alternate" type="text/html" title="Hello there 👀" /><published>2022-01-31T17:57:00+00:00</published><updated>2022-01-31T17:57:00+00:00</updated><id>https://blog.barnabycollins.com/meta/2022/01/31/hello-there</id><content type="html" xml:base="https://blog.barnabycollins.com/meta/2022/01/31/hello-there.html"><![CDATA[<p>As you may have noticed, this is a blog. Yes, I’ve started a blog.</p>

<p>When doing sound tech stuff, I’ve often come across little things that have
taken a bit of time to figure out. I’ve also often wished I had something to
point to when less-knowledgeable people asked a frequently-asked-question. For
example, I often had to explain what I expected from a band’s rider.</p>

<p>For those wondering, I’m a sound technician with some (admittedly quite limited)
experience working on a range of different events at Durham University. At my
university, there are many different technician collectives (for the most part,
one for each college plus a couple for specific groups) but the vast majority of
these are more lighting/theatre-focussed than sound focussed - resulting in a
surprisingly small group of sound specialists (and an imbalance of training,
making it hard to become a sound specialist without working with someone who was
one already).</p>

<p>I’ve also always wanted to figure out Jekyll as I’ve used GitHub Pages for a
long time but never really got into any of its cooler functionality. So it
seemed like a smart idea to solve all these problems in one go.</p>

<p>The intention of this blog is to serve as a repository of information that I can
point to. I’d also like to start writing a bottom-up tutorial series on sound
tech basics, because (while I admittedly haven’t searched for this too much) it
seems like it’s hard to come by a good centralised resource for sound tech
advice.</p>

<p>So my (potentially somewhat self-important) quest with this blog is to try and
create something that covers the practical basics of how to do sound on a
day-to-day basis, built on things I’ve learned the hard way over the past couple
of years.</p>

<p>I guess I’d better get on with that.</p>]]></content><author><name></name></author><category term="meta" /><summary type="html"><![CDATA[As you may have noticed, this is a blog. Yes, I’ve started a blog.]]></summary></entry></feed>